Monday, December 21, 2009

band action

Photobucket
I thought i would post one more photo from the band shoot the other night.
The colors were horrible as they had red gels on their stage lights, thus the conversion to black and white.
You would have to know the singer to know that this is a classic pose for him.

Friday, December 18, 2009

band photo

Photobucket
I got a last minute call tonight to shoot a band, the downtown blues band, before they went on stage at a local bar. I had 15 minutes with them from the time that they all arrived until they went on stage. I first of all had to find a background setting in the bar that worked for me. This is always the hardest challenge for me, where to shoot. I had the dj frig with the lights in the background until they looked good. Initially they were red which i liked, until the band members stood in and it spilled on their faces. Blue looked better on them and we went with that.
I set up two sb flashes bounced into umbrellas, one to the right of them and one to the left and a little behind. I set another sb flash on the floor behind them for a bit of rim but I think it died shortly into the shoot. Its an old, really old sb25 and is really slow to charge. Not sure if the batteries in that one were fresh either but no worries, I didn't really need it.
I used a 24mm lens (as i had no room and was actually standing through a doorway to another room), iso 400, f5.6, and 1/6 sec, handheld of course (ha). There was really no light on them so a slow shutter speed would not blur the people at all. I could live with a bit of blur in the background and was not worried about that.
In the end the only thing i wish was that they were more animated. They are a really fun group and i felt that may not have shown in this series of photos. I still like the shots though.

Thursday, December 17, 2009

frozen portrait

Photobucket
It hit -25 C today so of course it was the perfect time to do an outside portrait of a friends sons. I had the bright idea of heading downtown to a really cool alley i walk by all the time to go to lunch. I started on the other side of the alley and set up one sb24 flash bounced into an umbrella. It was so cold that by the time i had the light balanced with the ambient, about 2 minutes, the batteries mush have chilled and it was slow to recycle.
I only took a few shots on that side of the alley and then moved to the other side, that you see here. I turned the lights off and went with ambient. It was giving me a bit of cross light and i liked it so i stuck with that for the rest of the shoot. I couldent feel my fingers so i just got them to move around a bit and i held down the shutter button. If i was that cold i would well imagine that they were twice as bad since their mom was holding their winter coats.
I used a 24mm lens, iso 400, f2.8, and 1/60 sec shutter.
I opened the image in lightroom and did most all corrections. Here are the settings i used in lightroom:
exposure -40, recovery 4, fill light 22, blacks 6, clarity +100, vibrance +32, saturation -10. The rest were pretty well at default.
I then opened it in photoshop and sharpened, and did a curve. Shucks, i forgot to do a vignette, just a subtle one would have been nice. I laid down one of the grunge borders i talked about yesterday and transformed it to fit.
I wish it was not so cold and i could have taken more time on this one. I would have worked more on the pose i think.

Tuesday, December 15, 2009

just foolin around

Photobucket
I was testing a lastolite 1 stop trigrip diffuser the other day and thought i would play with the images a bit today.
A lastolite trigrip diffuser is just something you can shoot your off camera flashes through to soften the light. If you follow strobist or joe mcnally then you have heard of it a long time ago.
I did a test with direct flash and compared it to shooting thru the diffuser and it really did soften the light. I have some more experimenting to do, like comparing it to a shoot thru umbrella among other things.
I brought the photo into lightroom and hit the cold tone preset and then played with the exposure and other sliders to get it looking how i wanted it. I opened in photoshop and did a curve to up the contrast and then applied a grunge border. It is just one i downloaded from NAPP i think and it just sits as a layer on top of the image. I had to transform scale the image to make it fit in the border and then flattened. There was more to the image than what is here but i wanted a bit of a tight crop.
Actually here is the link to the grunge borders
http://www.640pixels.com/articles/free-photoshop-grunge-borders.aspx

Monday, December 14, 2009

another pano

Photobucket
I shot this pano a while ago and placed it online for when i needed a filler.
I cant remember how many frames i took here, probably 7 - 9, but i do remember i shot them fast while the players were set and not moving around. I sent them to panorama through lightroom and then did a curve on the finished, flattened file to taste.
They call this gym "the pit" by the way.

Sunday, December 13, 2009

not famous

Photobucket
Its not me their reaching for but for money. Our downtown has an annual dollar drop and people come out of the woodwork to try and catch a few. Its actually a really good, fun event and my kids even participated in it for the first time. I was there shooting anyway so why not. My son caught $30 and my daughter and her friend managed to snag $35. Then we had to go shopping of course.
I managed to negotiate my way up on a balcony of a museum that the event was held in front of which gave me a perfect vantage point for the event. I shot alot of frames and caught some great expressions.
Nothing done in photoshop except resizing the photo. Everything done in lightroom.

Saturday, December 12, 2009

rink pano

Photobucket
I did a pano of a hockey game i was at last weekend which was made up of 9 vertical shots taken with a wide angle lens (a 17 i think). I actually did one pano with the images exposure set for the ceiling and the crowd and one pano with the settings right for the ice. I put one on top of the other in photoshop and created a mask to have the darker ice show through the image with the lighter crowd and ceiling.
I had to do a bit of retouching because the two panos were not exactly the same. I guess it can be a bit random when they are generated. It all worked out pretty well in the end and was just a bit more work than i had counted on.
I sent the images to be made panos straight from lightroom. Just go to PHOTO - EDIT IN - MERGE TO PANORAMA or something like that.
When shooting i did it as fast as i could before someone moved too much. I also waited for a faceoff for this reason as well.

Saturday, December 05, 2009

event photography

Photobucket
I was shooting an event, outside, today and saw this wee one enjoying a cookie. I got fairly close, after asking her parents if they minded me taking her photo as it may get published, and took about 10 shots with my 80 - 200 lens set to 200. After about 10 she had had enough of me and climbed up in her fathers arms.
It was a very overcast day which make the light incredible for shooting outside without adding any flash.
I did all camera raw adjustments in lightroom and then opened the image in photoshop. I didn't do much other than a curve for color and contrast, a heavy vignette (i created a mask after to remove the darkening from her face), sharpen, and lastly i dodged her eyes with the dodge tool set to highlights at 15%. I burnt down the cookie a bit too with the burn tool set to midtones.
I have been shooting lots these days and am going to try once again to post an image a day for this month. My goal over the christmas break is to get a cool shot of my son for his newly decorated room and to get better at hdr.
Even though i have been busy i am itching to get out and do some shooting.

Wednesday, November 25, 2009

a stroll downtown

Photobucket
I have always said that i want to take a vacation in my own town. I rarely get a chance to walk around and take some photos and i really, really enjoy it when it happens. Today unfortunately was not one of those days but i was downtown and did take a photo. I had some business to do at lunch and this building was right beside where i parked my car. I have never noticed it before and thought it was just kind of out of place and weird. I shot some bracketed frames and ran three of the exposures through photomatix. I then upped the contrast quite a bit and the saturation a bit too.
I now want to do some more walking around and shoot a bunch more photos. I have to shoot my neices grad photos and think i will just drag her around with me and shoot some funky, overly dramatic photos. I plan to use one light and overpower the ambient. My plans by the way are not usually written in stone.

Saturday, November 21, 2009

not every studio is perfect

Photobucket
I shot 9 full body shots and portraits on location last week. I was taken to "the only room that is available" and lets just say i was less than excited. It was a lovely board room, dont get me wrong, but it was small with brown walls.
I have shot in alot worse, really really worse on occasion. Like your subject in the room with a light and you out in the hallway shooting through the door. But i did not have to do full body in that situation and last week i did.
I set up two lights, one as a hair/rim and the other as the main. I used a dx camera and a 35mm lens to shoot the full body shots which made them look a bit on the wide angle side for my liking. I also shot some waist up shots which i was able to use a 70-200 lens for. Everything worked out alright but it got me thinking of many of the places that i have been led to set up for a photo session. I have moved more chairs and boardroom tables than most people will in a lifetime.
For this pano i took 7 vertical frames with a 17mm lens, and sent them to photomerge from lightroom (in lightroom go to photo - edit in - merge to panorama in photoshop).
I just thought of a fun little test. I am going to do a shot in a closet with two lights and see what i get.
I will post the results.

Thursday, November 12, 2009

falls closer

Photobucket
Wow, a three post day. That just dosen't happen in my world.
I moved in nice and close with a 24mm lens for this one and shot at iso 100, f22, and a shutter speed of 1sec.

falls in hdr

Photobucket
We went on a little hike yesterday (rememberance day) to a place called hays falls near woodstock nb. Its about a 20min walk in from the highway on a pretty nice trail. The falls were great and i spent too much time taking photos, many, many photos.
This image was well bracketed and then 5 of the images were loaded from lightroom into photomatix pro. I am not entirely happy with the image but thought i would post it anyway as i have been slow on posts lately.
I was trying to blur the water as much as possible which meant putting my iso on the lowest it would go, aperature to f22, and then setting my shutter speed to get the exposure right. I had a tripod in the water and was set fairly low.

night shot

Photobucket
I have been wanting to do this shot for some time now but just needed both the time and the subjects.
We went to a downtown street and i set up two sb flashes on the sidewalk. The main light was to camera right and bounced into an umbrella. The rim or back light was a flash zoomed in a bit and shot direct. I used a 80 - 200 lens at f2.8 and zoomed pretty well to 200. I used 2.8 so the lights in the background would be round and i would not see the hexagon shape of the lens aperature. I cant remember the iso and shutter speed but i will post that here soon. I think the iso was up pretty high and the shutter speed was slow.
My models were perfect for this shot as they tried to stay warm on a night that was quite cold. I photographed them for an hour and a half in 4 locations before their ceremony which started at 7pm.

Monday, November 02, 2009

shallow depth

Photobucket
I have been playing around, in my spare time, with some shallow depth of field close up kind of shots.
Not much to show or really talk about yet. Hopefully soon.
This was shot at 2000iso.

Thursday, October 29, 2009

fall for hdr

Photobucket
I have been wanting to do some more hdr stuff but have not had a chance. I had a shoot to do this morning and on my way back to the car, although i was very cold, i thought i would take a minute to lay on the ground and look stupid.
"Are you getting some nice pictures"? Yea, yea, just move along and stay out of my shot, i haven't had my coffee yet.
The ground was cold but i did not have a tripod. Nine bracketed shots hand held is not pretty when your shaking. So just lay on the ground, hold your breath, and shoot.
I used 5 frames on this one. I used the normal exposure and the two darkest and the two lightest.

Tuesday, October 27, 2009

stolen chair

Photobucket
One of our family cats likes to follow me around. I got up for a sec tonight and lost my chair.
I thought it may make a nice shot so i used natural light, tungsten, and set the camera to iso 1600 at f2.8 with a 24mm lens. It was set to aperature priority, a little test, so i am not sure what the shutter speed ended up at.
I played with the image a bit in photoshop. Put a pretty good vignette on it and then removed the darkening just around her face with a mask. I wanted to tone down the background and her body as it was pretty bright. The vignette dulled it down nicely.
I then upped the contrast and did a few curves to get the color right. I increased the saturation a fair bit and sharpened.
I am in the mood to do some shooting but i have a few computer tasks ahead of me before i can do that. I am shooting a couple more grad photos soon and am looking forward to that. I had fun at the last one and have some good ideas for the next two. I think i will stick to one light again and head right to dramatic.

Tuesday, October 13, 2009

basketball action

Photobucket
I shot a couple basketball games this past weekend and managed to get several frames that i liked.
I started shooting with a 17mm lens on the d700 from under the net and came very close to getting smoked with the ball. Shortly after that i moved back a ways and pulled out the 70 - 200 f2.8. This shot was taken with that lens.
Iso was 2000, auto white balance, shutter speed of 1/250 sec and fstop of 2.8.
I have spoken about how much i like the auto white balance on the 700 before but will mention it once again. I did no color correction to this file.
There was another shooter there with a d300 who was using the kelvin white balance method and his shots, although very nice, were very warm. With raw of course we dont care in the end as all that color stuff is way too easy to fix, but its nice to be close in camera.

Monday, October 12, 2009

grad photos

Photobucket
Its been a very long time since i have shot a grad photo. I really was not sure what to do when we started.
There were a couple of things i had decided on right away once i arrived which were:
- I was going to use one light, sb flash bounced into a small silver reflector. It was very windy and i got her mom to hold my light stand.
- I was going to use my longer lens to compress the foreground and background a bit.
- I was going to have some fun.
I did some shots first of all at the location you see in the left hand photo. I did some different angles and had her look in different places. Pretty easy. I then shot some just around the corner from this by an old door.
We moved locations for the photo on the right just to change up the feel a bit and she changed clothes on the way. I knew of this cool white picket fence and hoped for some color. I again used one light, fired off camera by pocket wizards, and had her mom hold it again. I put it up fairly high to try and keep some light off the fence and her feet. I should have zoomed the head in a bit but was getting cold and lazy. I thought it looked pretty good also so why break the flow.
The sun gave me my hair light and i used a large tree to my left as a gobo for my lens as to not get flare.
My model was excellent, i had lots of fun, and i was very happy with the photos.
I have another one to shoot this week and i am looking forward to it. Hopefully it will be warmer outside.
One funny thing about this shoot was the cat that came out of nowhere. It was one of the friendliest cats i have ever met and as a result he was in a few of the photos. Oh, and the three guys that also came out of nowhere who we thought were going to steal my camera bag. In the end, everything worked out fine.

Tuesday, October 06, 2009

the actor

Photobucket
actor - one who interprets, in this sense, an actor is one who interprets a dramatic character.

Monday, October 05, 2009

another portrait

Photobucket
I am still posting portraits that i shot last week but you will be glad to know that i am almost done and will only post one more from that series of shots.
This is a guy that i work with who was just stung by a bee and his tounge swelled. He was nice enough to pose before heading for first aid. I am kidding. There was no bee just a funny guy that gave me a whole range of facial expressions to shoot.
I shot quite a few images as he was changing the whole time. I have always said that i can only do half the work. If the subject can participate and try to make up that other half then you have magic.

Saturday, October 03, 2009

portrait session

Photobucket
As i may have mentioned in my last post, i shot 4 portraits recently and thought i would just continue along to the second in the series for tonights show and tell.
Light setup stayed exactly the same as my last images, one in front and one behind.
I did a little retouching in photoshop but not much.
My favourite shot from this series is the image on the right. I really liked the eyes too however and wanted to show them in another shot, thus the image on the left. I have always liked photographing people with freckles. Why?? No idea. Mabey i can do a series of shots someday of many people with many freckles.
I still have two other people in the cue to share with you but i am having trouble picking my favourite image from one of the shoots. I have about 10 that i like. Mabey i will do a contact sheet image and you can pick the best one for yourself.

Thursday, October 01, 2009

tryptic

Photobucket
As i mentioned the other night, i was in the mood to shoot some portraits.
I was able to shoot 4 people today, took about 5 minutes each, and all were just happen chance. I set up the lights for the look i wanted and then just said "hey, follow me". Each persons images were different and all shot under the same light setup.
I used one light for the background with a 30 degree honeycomb grid spot pointed straight at a black paper backdrop and used one light, butterfly, placed just above and in front of subject shot through a umbrella. I kept this main light as close to them as i could. I shot with a d700 and a 50mm f1.4 lens. My head was touching the umbrella so just to be safe i held a reflector, still in its black carry bag, over my head and camera to block any spill on me.
I only did a few shots of each subject and really was very happy with all.
In lightroom i cranked up the clarity a bit (80 i think) and just adjusted the exposure, blacks, and white balance settings. I wanted to keep the images with a cool tone and think i may have taken them too far away from this in the end.
As stand alone images they work very well but have to be viewed large for the full effect. They are extremely sharp and you can count the pores on the skin.

Wednesday, September 30, 2009

combo

Photobucket
I am in the mood to shoot some portraits. Why i have no idea.
Until i get some shot i thought i would play with a couple photos i took last month.
With the photo on the left i used the dodge and burn tool, mabey a bit too much.
To up the contrast a bit, with both photos i created a new layer and converted it to black and white. I did an adjustment and increased the contrast by dragging the white and black sliders three squares towards the center. I then changed the layers blend mode to overlay and decreased the layers opacity down to 15%.
I also did a vignette on both photos seperately.
The photo on the left was shot with available light and the photo on the right used one off camera flash placed to the left and aimed direct. The right hand photo was shot around noon.

Tuesday, September 29, 2009

cool location

Photobucket
My family went apple picking tonight at a place that i have never been before. I thought it was incredible visually and ended up shooting the whole time and not picking one apple. My daughter and her friend just ate and threw them at each other so i guess it was my son and wife that did all the work. Fitting as the two of them later made an apple crisp that was great.
I just combined three images here and ran through photomatix.
Below is another one, since i missed a couple days of posts.
I just did the exact same thing to this one also. I also did a curve to warm it up a bit. My little trick to do this is to add yellow and magenta to the shadows on the curve. I also did an apply image to put green info into the weak red channel.
I will go over this approach in detail soon as it works great for fall shots.
Photobucket

Friday, September 25, 2009

inspiration reworked

Photobucket
I rarely rework an image but thought i would try this one in black and white.
Not sure which way i like it better, both ways i guess.
I went to a wonderful photography art exhibit opening tonight.
Congratulations to all of those in the silverfish group.

Thursday, September 24, 2009

pita pit

Photobucket
This is another image i took at the jazz festival. This one is straight up. No fancy process and nothing other than a curve correction and sharpened. Shot at iso 1250 f2.8 1/40sec with a 24mm lens.
Tired, must go to bed.

Wednesday, September 23, 2009

inspiration

Photobucket
First of all, yes i know, this is not a photo of a car.
I did look around for one, and found one, but thought this was a much better shot.
This shot gives me the opportunity to talk about inspiration and why we take some of the photos we take.
Sometimes its little things that spark an idea for an image. Today it was this scarf. I have seen the scarf before though, many times in fact, so why was it today that i wanted to photograph it. My guess is how it showed on the black outfit. It was the only source of color, other than the necklace. That was the "what" of the photograph. The "how" of the shot was the lighting and the photoshop high contrast look. All of this was included in the initial spark of inspiration. I saw it as a final image and in the end that is exactly how it came out. I am not saying that i have this great eye or anything as i am sure that many of you that read this post previsualize images in the same way. Sometimes we dont see it all of course and have to play for awhile to finish off the image. Another good thing to do it to "live with it" for awhile. Keep it on your computer screen or stick up a print and each time you walk by just take a quick look. You will start to get some ideas and also will probably notice some problems with the photo that you didn't notice to begin with.
So to end the inspiration speech my advice is to listen to it when it hits you and act on it. I have way too many photos in my head that should have been but i walked by them.
I lit the image with two strobes behind her and placed to the right and left for rim. I used one light for the main and placed it high and directly in front of her. All lights were direct and shot through a 30 degree honeycomb grid spot.
In camera raw i took the recovery, contrast, clarity, vibrance, and fill light to 100 and took the saturation way down. I upped the blacks and exposure to increase contrast even more. I then just retouched the image a bit and hit the scarf with the sponge tool set to saturation.
To finish the image off i extended the canvas size on the width so i could crop to a square. I sharpened pretty heavy also.

Tuesday, September 22, 2009

sign the bug

Photobucket
I never know what car i will find in my garage. Tonight it was a bug that was used at our local jazz festival to raise money for music in schools. For the small donation of two dollars you get to sign the bug. Pretty cool idea and obviously it looks like they did quite well.
I used a tripod here and bracketed over a nine stop range. Blended 5 images together in photomatix.
Thats all.
I should try to find another car for tomorrows post. Just to keep the theme going.

Monday, September 21, 2009

old ford in hdr

Photobucket
I shot a wedding this past weekend and i was very excited to see the car that would transport the couple from the church to the reception. I looked inside and knew that i wanted to try to get a minute to do some bracketed shots to play with later. This was shot handheld and three shots were blended together in photomatix. The only other thing i did was sharpen and do a contrast and color correction curve.

Sunday, September 20, 2009

guest blog sunday

Photobucket
My first guest blog entry, i am proud to say, is from my father.
He has taken a keen interest in photography over the past few years and is doing extremely well.
Judging from the amount of full slide trays stored in the basement closet at my parents house, this isn't a new passion.
The image you see above was taken at a local park (centennial park) and placed 1st in a provincial government photo contest. He has now entered two photo contests and has placed first in both.
And i thought i got my eye from my mother. Not so sure now.
This is a pano made up of three images and stitched together using photomerge in photoshop.
The images were shot at f8 1/640sec and iso 200 on a d90 nikon.
Thanks dad for sharing this image with me and the people who check in here once in awhile.
I know there will be many more great images to come.

Saturday, September 19, 2009

lights and color

Photobucket
Sometimes you dont really know why you like a photo but you just do.
I think in this case its the movement and color for me. I dont even mind the flare in the face.
I really did nothing to this image in photoshop, just adjusted the sliders in lightroom develop module.
I shot the photo at f2.8 1/25sec and iso 1250.
Tomorrow you get to enjoy my first ever guest blogger.

Friday, September 18, 2009

jazzy photomatix

Photobucket
We have an annual jazz and blues festival in my little city which i was fortunate enough to wander around at tonight with my family. This was the first time we took the kids and they loved it. I threw my camera around my neck with a 24mm lens just in case i saw anything of interest. I saw alot.
This was an outdoor stage and the sky above was great. My camera was set to auto white balance (which it always is) and it corrected for the tungsten that it saw under the tent, which made the sky a really nice blue. I was shooting at pretty high iso, but thought i would try a hdr shot anyway, handheld. I bracked 5 stops and chose three to blend together in photomatix. I did a couple curves and sharpened.
The only thing that did not turn out was the band under the tent. Where they were moving they turned out all funky. To fix this i just opened one of the original images and drug it on top of the hdr version. I selected both layers and hit edit-auto align layers. I then created a layer mask and masked out everything except under the tent.

Thursday, September 17, 2009

royal canadian mounted police

Photobucket
I was looking at my blogs stats tonight and coulden't help but notice that I have people linking in from all over the world but very few from right here in canada. On my journey through my lightroom catalog for a photo to post i found this one from new brunswick day.
The rcmp, i think, are well respected around the world and they wear really great dress uniforms {different from the everyday ones}. Thus my reason for picking this photo for tonight.
In photoshop i did a curve to adjust color and contrast and then used the desaturate tool set to about 20% and painted over the grass in the foreground and the trees in the background. This helped really bring your eye to the main subject and make them pop out of the frame a bit. I then used the saturate tool and hit the red jackets just a bit. Try this method sometime. If you do a before and after you will really notice a difference.

Wednesday, September 16, 2009

adding flash outside

Photobucket
I seem to add a little touch of flash anywhere and everywhere these days. I have always liked ambient light photos but i find it rare that the ambient looks good when its a photo that i want to take. This image would be a prime example. The bands faces were in shade here, well mabey they had a bit of setting sunlight on their right sides, but nothing on their left.
I put a sb flash at the front right hand side of the stage and one at the front left. I just adjusted the power on both so that the left was brighter than the right and also set so that i could get the building behind them captured at under a 1/250 sec shutter speed (my cameras fastest flash sync). You definately dont want to set both flashes at the same power. This gives flat boring light, called copy light. Use it for artwork or copywork or large group photos (actually for groups move the lights more to the front and set them up nice and high). I always use my flashes on manual unless i have them on camera and am bouncing the light off a ceiling or something. I just adjust the power up or down a bit at a time and take a photo to see how it looks. Too easy. After awhile you can get a really close guess on the first crack.
I set off the lights with pocket wizards which i highly recommend you purchase at some point, or something like them, to get your flash off camera.
In photoshop i cranked up the clarity and upped the contrast by the method i have talked about in previous posts. I sharpened and was done. I did not use the clone or heal tool once on this image which could well be a first for me.
I tested this image as a black and white also and i really liked it.
The band by the way are "the hardcore troubadours".

Tuesday, September 15, 2009

liquify plus lots more

Photobucket
I have had the models permission to use this photo on my blog for some time now but just didn't have the energy to type about everything i did to this photo.
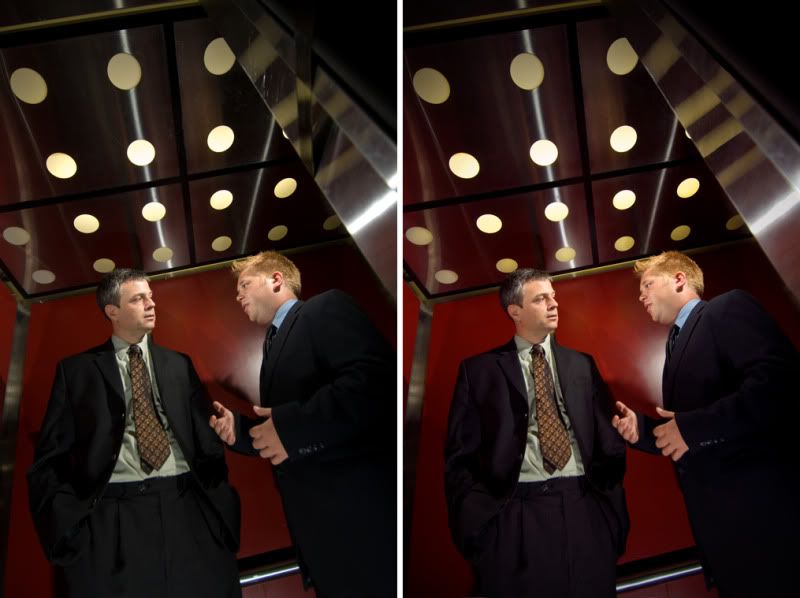
On the left obviously is the original and on the right is the retouched version.
Lets start with the concept. Two business professionals in an elevator. One has 60 seconds, or the time it takes the elevator to get to its destination, to sell the other on his idea. Cool.
We will now move on to how i saw it photographically. I started with a tour of the elevator to get my head around what i would do. I then sketched out a lighting diagram and in the end almost stuck to it. The wanted room at the top for some text so i decided to stay low and shoot up to get the lights in the ceiling. The elevator was pretty tight so i used a 12 - 24mm f4 lens. No, if i lay on the ground and shoot up at 12mm it wont distort anything, like waists or hands, no.
I moved next to the lighting. I considered my main light the one i placed high to the right side and aimed at the guy on the left. It gave nice light on him and a hair light for the guy on the right. I then needed to fill in the guy on the rights face so i put a light on the left hand side, zoomed in the head, on both flashes i think, and aimed it at the right hand side guy. With both flashes fairly high and zoomed in, everything from the waist down was black. My original intention was to stick a third flash on the floor and aim it straight up to give a splash of light on the back wall. I changed this idea and moved the flash out to the front of the elevator, set on the floor, and aimed it at their legs. It did cause some weird shadows on the back wall but i retouched them out later. I just set my shutter speed to the setting that put the ceiling lights at the brightness i wanted them. Easy.
The shoot was easy that is, the retouching took some time.
I started the retouching by removing the duct tape i had holding the elevator door open on the right of the photo. This took the most time. I also touched up any other little imperfections on the elevator walls and any shadows i did not like. Just used the healing tool and clone tool for this. I then used the liquify tool to shrink the guy on the lefts waist and legs and the guy on the rights hand in the foreground. This worked really well.
I did a few curves and sharpened. I added a vignette and i think that was all i did.
I was very happy with the outcome and thought it was worth the time invested.
Looking back at the photo now i realize that i should have shrunk the guy on the rights lower half a bit too.

Monday, September 14, 2009

photomatix interior

Photobucket
Photomatix is amazing, i really like it.
I had to shoot this room and the light was all over the place. It is all wood so if i had lit it i would have had reflective spots all over the place i am sure. It was a big room as well so how much fun would that be to light.
I had daylight coming in from the large windows and had spotlights on the sign at the far wall plus all the overhead lights to balance out. Photomatix did a great job. I bracketed over a 9 stop range and chose 5 of the images to blend together in photomatix. The color didn't come out all that great but that really dosen't matter. Just try to get the blacks and whites looking decent and then dump it into photoshop. You can open the file in camera raw and adjust there or just do a curve like it did on this one. I sharpened and that was really about it.
I have used this approach many times now and for the most part it works. Remember to use a tripod and a low iso.

Sunday, September 13, 2009

slow day

Photobucket
A slow day today is an understatement. I went to my sons football game and then sat in a lawn chair for the rest of the day.
I havent been taking many photos lately that i can post. I have a couple in the cue that i am waiting for permission on but other than that i dont have much to post. Looks like i will have to take the camera for a walk and get some new stuff to get me through the month.

Saturday, September 12, 2009

protection

Photobucket
Just a very light post tonight.
I thought everything about this photo said protection. I like the way the focus is on the main subject placed in the center of the frame. I used the creative aged photo preset in lightroom to give it the look it has.
I have a story brewing about this shot but am tired and it is not coming together fully.
I will try to add to this one tomorrow.

Friday, September 11, 2009

last of the 1.4s

Photobucket
This is the last shot i took while i was shooting outside the other night.
I put the camera on "auto area AF (auto focus)" and held it above her in my outstretched hand. The camera did an amazing job on the focus. The black background is my paved driveway.
The only thing i did in photoshop was lower the saturation to 0.
Tomorrow i start posting my f2.0 portraits, kidding.

Thursday, September 10, 2009

another f1.4

Photobucket
My son is amazing. No two ways about it.
This is only one example. Last night as i was shooing my f1.4 portraits he had a headache, a very bad headache. He still however gave me two minutes to take his photo with no complaints at all. After a trip to the doctor tonight it turns out he has an ear infection. Ouch.
I really did nothing to these images in photoshop. Just placed them all on a new canvas to show them together.

Wednesday, September 09, 2009

f1.4 portraits

Photobucket
I had an unexpected night off tonight. No work planned just my sons football game. He had a nasty headache however and halfway through putting on his gear we decided that several blows to the head on the field may not be a good idea.
I took to the streets with a 50mm f1.4 lens, my favourite by far, and a freshly formatted 4gb card. It was later in the evening and the sun was going down and as the kids rolled by on their bikes i noticed how the light was hitting them. I decided to first of all lay in front of them so they could not go anywhere and then shoot at an upward angle as to just get sky in the background. I did a little series and this is the first one i will post. I shot it at iso 100, f1.4 and 1/8000 sec.
I only did a little bit in photoshop. I cranked the clarity up to 100 (in lightroom) and just retouched some highlights out of the sunglasses. I played with a curves adjustment layer quite a bit until i got the contrast and colors how i wanted them. That was about it.

Tuesday, September 08, 2009

bonfire flames

Photobucket
Lets set the mood here to start. Its friday night after a long work week. The street is quiet. Dark settles in. My fire pit sparks to life and the sweet aroma of burning hardwood travels from house to house. Doors start to open and out filters friendly faces carrying lawn chairs, hot coffee cups, and snacks to share. This event, luckily, happens frequently.
I thought i would try a few shots of the flames while sitting there staring at them and was quite surprised at the results. The patterns the flames create were amazing. I did a series, all shot from the same point and had planned to try to do something with them but never did.
I shot this image at iso 400, f4.5 and 1/1250 sec with a 50mm lens.
I will try a bunch of shots sometime at different shutter speeds. Might be interesting. Cant wait till friday.

Monday, September 07, 2009

missed shot

Photobucket
I am not talking about the golf shot in my title but the fact that already, three days into my little self challenge of posting one shot a day for the month, i have missed a days post. Last night in my defense was beautiful outside and all the neighbors got together for a bonfire and fireworks for the kids last weekend of summer vacation. We stayed out till well after midnight and thus the missed post.
The photo above is from a recent golf game and i ended up doing a fair bit to the image in photoshop. The tee box was battered to say the least when i started. Five minutes later with the heal tool and the box looked pretty good. I removed a bunch of grass sticking up on the grass edge in front of the golfer, my partner for the round. For this task i used the clone tool. I then played with the dodge and burn tool on the distant shore and was done.
This shoot was the second time i have ever shot jpegs with my camera. Lightroom made it nice to work with them though. The only trouble i had was correcting the color in the image. All the green threw me and although i am still not sure how i would have made it better, i am sure it in fact could be better.
It was my intent to keep the image a bit on the dark side. I wanted my dodging on the far green to show as a light point, as well as a little dodging around the ball.

Saturday, September 05, 2009

room shot with tech

Photobucket
Not much time to talk as it is three minutes to midnight and i am still on the goal of one image a day for the month.
This was a really, really cool inn that i would guess not too many people have ever heard of.
I used two sb flashes. One was just laid on the table to the right of the laptop and bounced off the wall back on to the guy in front. The second flash was hidden behind the tv and aimed at the two girls in the background (zoomed in the head also). I had a full cto gell on each flash and had the camera white balance set to tungsten. You can see some blue in the background right hand side which was caused by a window being back there (i liked it though). Shot with a 24mm lens, f3.5 at 1/15 sec hand held and iso 200.

Friday, September 04, 2009

photo of the day

Photobucket
I shot this image a couple days ago as students were moving back onto campus. I just asked them to get close together and give me something cool and this was their result.
I took the image into photomatix and funked it up a bit. I then blended this result with the original image to lessen the photomatix effect a bit.

Thursday, September 03, 2009

one photo a day

Photobucket
I am tired tonight, very tired. Mabey thats why i had this crazy idea to post one photo a day to this blog all this month. I am planning to talk about some and not others.
Being a photographer i get to see alot of stuff. By posting more often my hope is that you get to see slices of what i see.
This may not end up being that exciting but i will try hard to make it at least worth the 30 seconds or so you may spend here.
For some reason, this past monday, i had 106 different people visit my blog. Thats not a record but i just thought it was strange as i had not posted in almost two weeks.

Saturday, August 22, 2009

a couple panos

Photobucket
I shot the above image last night under the soccer field lights. I knew it would be good lighting as the they line both sides of the field (cross lighting). I boosted the contrast in this image by the layers technique that i have discussed in previous posts.
The bottom photo was one i took a month or so ago.
What i like about cropping a photo for the web is that anything goes. I remember in photo school that i hated the 8x10 print size. One reason was that i printed about a million of them and the other was that it did not allow the full neg to be shown. I'm not so "pure" anymore and need to show the full image but i still hate the 8x10 crop. For the most part now i dont set anything in my crop parameters and just set the guides to what looks good. It could be 9.3 x 4 and that would be just fine. Cropping in lightroom is even better. I can fly through a shoot now and crop as i go. If i decide later that i have to change it thats fine, just go back and move the borders, the whole image is still there.
Photobucket

Thursday, August 20, 2009

a bit of retouching

Photobucket
I scanned this image today from a 4x5 negative on an epson perfection flatbed scanner. The scanner works great on negs and all looked pretty good, except for the missing parts of the negative. I didn't really have to retouch the image but saw it as a bit of a challenge and decided to just do the peoples faces. That led to the rest of the people and then to the background. I certainly would not say that the job is perfect but i had lots of other work to do and could not spend much time on it. I thought it turned out ok for a rushed job.
I used the healing tool and clone stamp tool only. Lots of sampling and patience help too.
Actually i forgot that i had to fix the little girls face that has the big white blob over the right side. I selected the left side, copied, pasted, flipped horizontally, and moved it into place to cover the blob. I just blended it in after that so it would look real.
Below is the fixed version.
Photobucket