Tuesday, September 30, 2008

high contrast in camera raw

Photobucket
I shot this image tonight for a passport photo.
I thought i would have some fun and was pretty happy with the result.
I used one light bounced into an umbrella that was placed in front of her and aimed straight at her. It was about 6 feet high.
I opened the image in camera raw and used these settings:
temperature 5150, tint -10, exposure +.05, recovery 100, fill light 70, blacks 67, brightness +41, contrast +100, clarity 100, vibrance +100, saturation -88.
After all that i hit open.
I duplicated the background layer and went to filter - other - high pass. Set the amount to 6.4 and hit ok. Change the blend mode in the layers pallate to overlay and then lower the opacity to 66%. Flatten the layers.
Then i smart sharpened at an amount of 50%.
Next duplicate your background layer. Highlight the background layer (bottom layer) and fill with black (edit - fill). Now highlight the top layer (background copy) and in the layers pallate add a layer mask. Fill the mask with black. You will now see a black canvas. Change your forground color to white, select your paint brush in the tool tray and use a fairly small brush. Then make the small brush strokes such as you can see in my image above. Then use a larger brush and paint in white in the mask over your subject so no black strips can be seen on them.
Flatten and do a curve adjustment to up the contrast a bit more and save.
Sorry for rushing through this technique but if you try it you will see that it is very easy.

Thursday, September 25, 2008

neg strip again

Photobucket
I was just playing with the neg strip again and thought i would post it.
Still not sure if i have found where i am going with it.
I just opened one image file and dragged my neg strip onto it (see earlier post for strip details).
I duplicated this layer and erased the numbers then created new ones with the text tool.
I used the blur tool on them a bit too just to make it look like they belonged.

Wednesday, September 24, 2008

image restoration

Photobucket
Anyone that has a copy of photoshop loaded on their computer has received this request before, "is there anything you can do with this, it is the only photo in existance of this family". This last request came from my dad so of course i was going to take a stab at it. I also love doing restoration on old black and white images. Color not so much but black and white, bring it on.
I started this image by duplicating the background layer. I then used this new top layer for all my corrections.
First i desaturated the layer and then using the healing tool i retouched all the cracks and marks out. Just takes time and patience is all, really not that hard. When the healing tool messes up just switch to the clone stamp tool. I used the clone tool for all the edge work around the outside of the photo.
I then added a curve adjustment layer and brought the shadows up quite a bit. I also added a bit of yellow and magenta just to give it a little bit of warmth.
I used the burn tool set to shadows to darken up the kids legs a bit as they were weak.
I used the measure tool to straighten the photo and then cloned in the left edge to extend the background.
I cropped it and was done.
I also tried to reduce the pattern in the photo but had no luck.
Below is the finished photo.
Photobucket

Tuesday, September 23, 2008

white on white

Photobucket
I did a shoot recently of two pharmacists, seperately. The client wanted the shots on a white background for an ad in a newspaper and the subjects would be wearing a white lab coat, cringe.
I decided to try and make the background a bit whiter than the lab coat so i could clean it up and at least have an edge to work with on the coats. I used one light (shoot thru umbrella) on the subjects, and one flash pointed at a 45 to the background to make the area behind their heads white. I was in a very small office so the wall to the right of the subject provided fill.
The people were great, shots looked fine, and the individual shots were easy to clean up.
I thought i would see how difficult it was to strip them together and that proved a bit more challenging but not too much.
I extended the left of the canvas on the ladys photo and drug the man s shot in. I created a mask on the top layer (man) and filled it with black to hide all, i needed to see the ladys arm as i wanted it in the front. I then made a rough selection of what i wanted of the man to show and filled it with white. I chose my paint brush and painted in the rest of him (close to the lady).
By the way, i used the dodge tool set to highlights with an opacity of about 15 to make the backgrounds white in the single photos.
I also had the ladys head pointed down a bit which resulted in her neck buckling. I used the liquify filter to tuck it up into place.

Monday, September 22, 2008

film strip

Photobucket
I have been wanting to create a film strip digitally and place photos into it for awhile but just never got around to creating the neg image. I scanned a strip of 2 1/4 black and white film today on an epson flatbed scanner. I placed white paper behind it and just did a reflective scan. I cleaned it up in photoshop (dust and marks retouched) and upped the contrast with a curve till i got just black and white, no greys.
I used my magic wand and selected the black edge of the film (i had picked a neg strip where the image inside was white against the black film edge). I held the shift key and added the white text and numbers to my selection. I then inversed my selection so the only thing selected was the inside of the three images. I saved my selection, select - save selection and labeled it "edge", then saved my image to my desktop.
I then opened a new window and made it the exact same size as my film strip image, with a transparent background.
I did a full selection of my film strip image and while holding the shift key down i dragged it onto this new file.
I then went under select - load selection and navigated to my saved image, under channel i chose "edge" which i had saved before.
Now, with the inside of the three images selected on my top layer i hit the delete key, which showed through to my transparent layer underneath. Then deselect.
I then opened my three images that i wanted to place in the holes of my film strip and sized them to fit. I dragged them over and placed them in between my two existing layers. This let them go under the film strip edge. I moved them into place, sharpened them individually, and flattened my file so i could save as a jpeg.
I also scanned a 36 exposure roll of slide film that i have an idea of how to play with.
That will be coming soon.

Friday, September 19, 2008

lucis art again

Photobucket
Its been some time since my last lucis art post.
I was testing out my cameras auto face detect focus on continuous low drive tonight as my daughter ran along the sidewalk.
It did an alright job but i think i had it set wrong. I kept the camera pretty steady and held my shutter button down.
I opened up the six or so photos and then placed them all into one image so i had the six seperate photos as six layers.
I highlighted all the layers and used edit - auto align layers. I then created a mask on the layers so that only she showed through to the background beneath. I flattened the image when the masking was done and desaturated it.
Just so she would like the shot even more i ran it through the lucis art plug in and set the strength to about 75.

square format

Photobucket
The sun was going down last night and the neighborhood was alive with kids on skateboards. I put a 50mm lens on and ran out into the street with the motor drive on high (kidding, but close).
I tried converting to black and white by taking the saturation slider all the way down in camera raw and then did a curve on the open file to boost up the contrast, blacks mainly as they were weak.
I then tried a crop to square (i used to use a hasselblad in the old days and love the square format) and applied a 15 pixel black stroke (select all, then edit - stroke).

Thursday, September 18, 2008

team photo

Photobucket
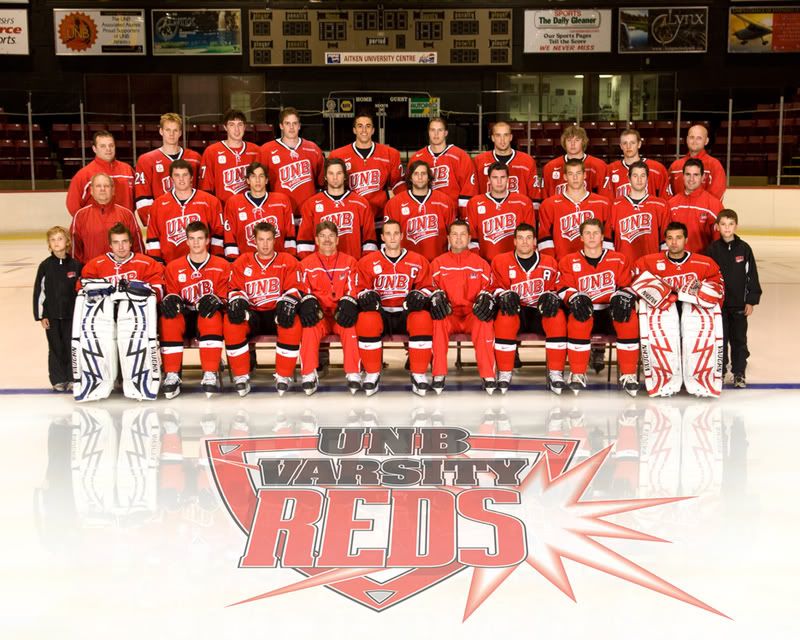
A team photo, but wheres the team???
Just a note before i get started, this could be a long complicated post, you may want to click the back button.
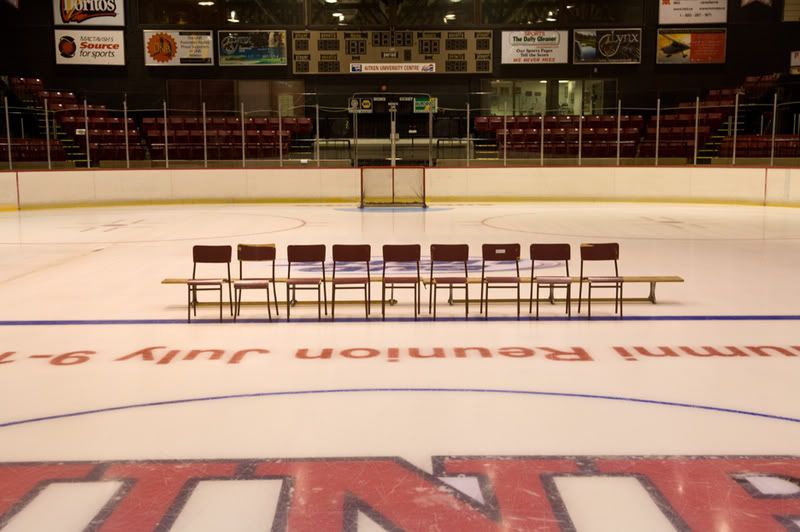
I have done this hockey team photo as long as i can remember. Each year, with digital and photoshop, i change the way i do it just enough to keep it interesting for me. While standing on a chair at center ice waiting to fall i decided to photograph the background scene with no bodies in the shot and no strobes turned on (available light).
I always have a problem with my strobes showing up in the glass behind them (see next photo) and i have to carefully retouch them out which is a pain. Not this year.
Photobucket
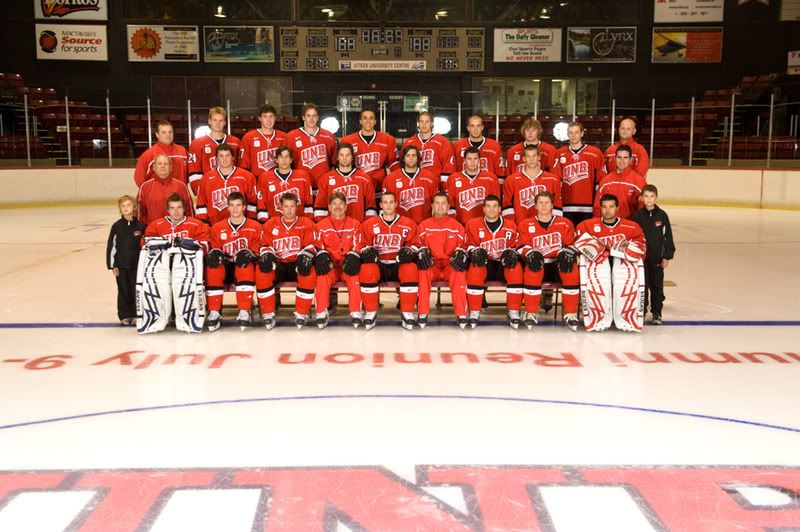
This is the team shot with two strobes bounced into umbrellas, basic copy light really. You can see what it does to the glass behind their heads.
I started by opening the above two photos in camera raw and adjusting the colors and white balance until they looked similar.
I opened the files in photoshop and then placed the team shot on top of the chairs shot by using the move tool and holding the shift key down and dragging it over. I then highlighted both layers and went under edit - auto align layers. I was hand holding the camera and the auto align function works great almost every time. I then added a layer mask to the top layer (team) and using the paint brush painted in black over the background glass (over everything from the top of the boards up). this allowed the underlying layer to show through, hard part was going around their heads but it worked in the end.
After this was done i retouched all the lines and text off the front part of the ice using the clone tool.
If you look closely at the photo above you will notice a player missing on the right side. He was absent so we left a space for him in the exact same spot he stood last year. I did a rough selection on him from the last years photo with the lasso tool and drug him onto the new team. I used the edit - transform - scale function to size him up a bit as i must have been zoomed out more last year. Note to hold down the shift key when you do this as to constrain the proportions.
I then applied a layer mask to his layer and painted in black over everything i didn't want to show (since i did a rough selection). It turned out that his shirt did not come down far enough as there was a head in front of him last year so i had to make a selection of one of the other players jersey (lower part) and drag that over and blend it in to fill the gap.
Once he looked good i flattened the file (saved it first of course) and duplicated my background layer. I went under edit - transform - flip vertical and moved the layer down to place it where a reflection would be on the ice. I had to rotate it a bit (edit - transform - rotate) to line it up and then i added yet another layer mask to this layer. I painted over everything above their feet with black on the mask and then went around the bottom edges with a lower opacity on the brush (just to fade the reflection into the ice).
I then drug the logo over from last years photo ( i just squed it and lowered the opacity last year).
I flattened the file and sharpened and cropped and, whew, was done.
All this only took 4 hours.
Below is the final result.
Photobucket

Monday, September 15, 2008

new camera

Photobucket
I did the upgrade from the d300 to the 700 today and all i can say is wow.
So far i am extremely impressed. I have been shooting uncompressed raw files at 14 bit and they are tack sharp.
I would definately say that this is a camera that i could keep for a long time, or until a new one comes out (joke).
For this photo i took two seperate images, one focused on the d700 letters and one focused on the nikon letters.
I opened both in camera raw and had some fun with the settings, and drug the saturation down to -100.
I opened them in photoshop and placed one on top of the other. I then went into the layers palate and highlighted both layers (alt key I think and click on the layers to select them). Then go to edit - auto align layers. I use this often as it works very well, like in a group photo that half the people blink - just align the layers and use a mask..
then i applied a layer mask to the top layer and painted in black over the d700 letters to show through to the sharp ones underneath. I flattened the layers and sharpened the file quite a bit so i could see some good sized grain.
This image was shot at 3200asa.

Friday, September 12, 2008

off for the weekend

Photobucket
I took this shot the other day by absolute happen chance as i was shooting something else and i heard the flock coming.
I thought it was fitting as i am "flying out of the office" to start the weekend.

Saturday, September 06, 2008

quarterback

Photobucket
Here is one more using the same method that i talk about in my last post.
I also added a .2 inch white border (canvas size) and a .1 inch black.

quad with masks

Photobucket
I took some photos today of my sons first ever game of football.
He did a quarterback keep play and since i had put my camera on high speed drive i managed to capture about 10 frames of the run. I opened up the sequence i wanted to play with and then changed their image size to 12 inches wide and 72 dpi (mainly because i was playing with them to put up on this blog). I then created a new canvas that would fit all the photos (25 x 16 at 72 dpi). I placed guides on the canvas, by using my move tool and draging the guide out from the rulers, so i could know where the center of the canvas was located. I place all 4 photos on this new canvas and moved them around until i had them where i wanted them. I flattened the layer and was just about to save it when i thought i might try making him color and the rest black and white. I duplicated my background layer and went to edit - adjustments - desaturate. I then applied a layer mask to this new black and white layer. All I had to do now is grab my paint brush and paint in black over him which allowed the color layer underneath to show through. I used a smaller brush and painted in white on the parts that i overpainted.
I lastly went to saturation and bumped it up by +12 to bring up the color in him a bit.
One note: If you try this, try to work with a higher res file. When i zoomed in on the image and was painting my mask, the edges were all jagged because my images were low res.

Friday, September 05, 2008

team jump

Photobucket
I did a team photo a couple days ago and when it was all over and the girls were walking across the field some unknown voice yelled "can we do a jumping shot"?
Of course was my answer and as soon as i saw it onscreen i knew the shot was great.
I used a 17-55mm lens zoomed to exactly 26mm. No reason for this it just looked right.
I put the camera on high speed drive and held the button down. They did the jump about 4 times but it was the very first frame that worked out best.
I posted the image mainly because i really liked it but also to state that you should always go for the spontaneous shots.
Its always those unexpected ones that end up being special.
Thanks to the girls for giving me permission to post this photo.

Tuesday, September 02, 2008

highlight vs shadow

Photobucket
Ok, last image for tonight as i have to get to bed.
I just wanted to show one more image from the d700. Pathethic isnt it how i am talking myself into it.
Anyway, this image shows one side of the street in full sun and the other in shade. In the full res photo i can see detail in everything on either side of the street. Nothing seems to block up except under the cars.

3200 iso

Photobucket
Thought i would post one more image from the d700.
This one was shot at 3200 iso hand held with available light and using the 24-85 lens zoomed in to 85.

nikon d700

Photobucket
I have been trying to decide whether to upgrade from my d300 to the d700 and finally got a chance today to test one out.
My first thought was that i would not upgrade but keep the 300 and purchase a new lens instead. We all know how much they cost. In looking at the lenses though, the only one i really liked was the 17-55 f2.8. That of course is a dx lens. My thinking is that investing a pile of money in dx would now be a waste with nikon now bringing out an affordable full frame camera. My next body would definately be full frame and the lens would just not do.
So where my head is now is in the 700 and throwing a 28-85 f2.8-3.5 lens on it. The lens is $669 and would get me by until i could find some more money for another lens.
I tested the 700 out and i was definately impressed. Much more than i thought i would be. This shot of the bike, left side is full frame and the right side is a crop of the left. It is at 200asa and shot with the 24-85 lens set at 24.
I tested it out at higher iso's also. 6400 was fairly grainy, no color noise though, but I would feel comfortable shooting at 3200 no problem.