these are links from the 2006 pdn photo annual from the best web sites section:
www.hanskristianriise.com
www.stevenlippman.com
www.joshrothstein.com
www.ba-reps.com
www.brendakenneally.com/theblock
www.chasejarvis.com
www.stocklandmartel.com/smart_book/2005
www.jefftse.com
www.garryowens.com
www.craigsherodphoto.com
www.marvilacar.com
www.nathanperkel.com
www.benjaminkrain.com
www.andreafazzari.com
www.feinknopf.com
www.allisonvsmith.com
www.matthewstylianou.com
www.glanger.com
www.oculi.com.au
www.dananeibert.com
www.bobbifabian.com
www.seanmurphyphoto.com
www.3am.net
www.jeremycowart.com
www.zizola.com
www.reena-adam.com
www.TogashiStudio.com
www.jamesdayphoto.com
www.mediastorm.org
www.mitchrangerphotography.com
www.noelletheard.com
www.grunertimaging.com
www.jefflipsky.com
www.reneeritchiephoto.com
www.flotowarner.com
www.LifeShots.co.uk
Sunday, May 28, 2006
dodge white backgrounds
I do a great deal of portraits on a white background and making that background white is difficult with lighting. You could set your background light to two stops brighter than your main light but this also usually produces flare or interferes in some way with your subject. I dont worry too much about this because i have a dodge tool in photoshop that works quite well. Set the tools mode to highlights in its option bar and the strength quite low (10 - 18). Use a nice soft brush, not too small, and go over the white areas of your background. It should not affect your subject unless they too are wearing white.
Saturday, May 27, 2006
weak channels
This is a great tip for weak color channels. For example, if you shoot something red (flowers for example) you will notice that you dont see any detail in the reds. Heres how to fix that.
Step 1: go to your channels window and click on the red, green, and blue channel seperately (or use ctrl 1,2,3 and the tilde key to get back to rgb).
If a channel is weak you will see alot of white and no detail.
Step 2: choose the channel that the detail looks best in. For weak reds the green channel is usually the best.
Step 3: go to window - layers and duplicate the background layer.
Step 4: highlight the background copy layer and click on the weak channel in the channels palette. You should now be viewing the background copys red channel for example.
Step 5: go to image - apply image.
Step 6: here is what you want the settings to be in the apply image box.
layer - background
channel - green (or whatever channel had the best detail in it)
blending - normal
opacity - 100%
Step 7: hit ok.
Step 8: go to your layers palette and change the blending mode of your background copy layer from normal to luminosity.
Step 9: make sure in the channels palette you are on rgb (you want to be viewing all the colors)
Step 10: lower opacity of the background copys layer till it looks good.
note: you could always make an action of this to use in your workflow.
Friday, May 12, 2006
city hall show
To my former photoshop students, great job on your city hall show.
I was there today dropping off an invoice and out of the corner of my eye saw rebekah staring at me (her portrait that is). If it were really rebekah in person i would probably still be there talking (just kidding rebekah).
Quite honestly i did not expect to be as impressed as i was. It looked very professional and the images were very well chosen. Congratulations.
ocean in color
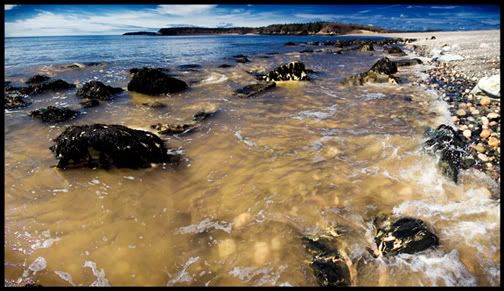
just wanted to post the color version.
I used the same technique that i did with the cat.
Thursday, May 11, 2006
color space for web photos
See, back already.
When you post images to the web or send them to a 1 hour lab for printing, make sure that they are in the srgb color space. If you are shooting in raw just make sure that the space in the bottom of the camera raw dialogue box is set to srgb. If you have a file in the rgb 98 color space just go to the edit drop down menu - convert to profile - destination space - srgb. Just do a comparison and you will see the difference.
I am not saying by the way to never use the rgb 98 space as that is what i use the most. It has a greater range than the srgb space. I use it for photos that will be seen on my monitor or photos that i will print locally (ink jet printer in office).
photographers site
sorry for the slowdown in posts.
I have been preoccupied by photography lately.
My thoughts and efforts have been dedicated to photoshop for years now but recently i have become interested once again with lighting and overall photography. I will still be updating this blog with photoshop stuff regularly and cool photos. Keep watching. The main reason for this post was not to talk about my thoughts but to give you a link to a bunch of photographers work.
http://www.ba-reps.com/list/photographer
Be back soon.
Saturday, May 06, 2006
cool effect

This is Fred.
Ok, now that introductions are over what did i do to the photo. I have been playing with an effect (all mine so far as i can tell) that messes with the color and depth of the image a wee bit.
First i duplicated the background layer and highlighted the background copy in the layers pallete. I went under the image menu and down to adjustments - channel mixer. I clicked on monochrome at the bottom and then slid the red channel all the way to the right, took the blue quite far to the left (not all the way), and then the green to the right just till it looks right. I hit ok and then in the layers pallete changed that layers mode to luminosity. I lowered the opacity to about 80%, added a curves adjustment layer to boost the contrast, added a saturation layer adjustment to boost the saturation and ended by smart sharpening. I recorded all of the steps (not the curve and sat layers) in an action and can now use it on other images quite quickly.
Thursday, May 04, 2006
ocean 2
I am waiting for my 350 images to download that i shot tonight and thought i could take a minute to post another ocean trip photo. All i did to this one in photoshop was crop and sharpen. Also my friend noel would be proud of me as this is a found shot and was not altered while being photographed.
Wednesday, May 03, 2006
ocean black and white
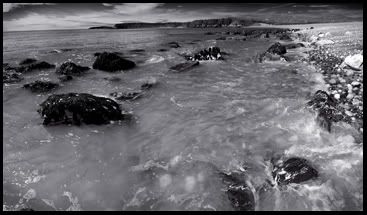
I had a few minutes after a shoot today and thought i would do a little fun shooting and get a bit of sun. In the short time i was there i came away with about 5 seperate images that i liked. This image was of course 3 seperate photos stitched together. My stitching software and photoshop photomerge did not work at all on this project so i had to do it manually with the help of layer masks. I made a mask on the center photo and then applied a gradient to one side to blend into the background image. I then had to do the other side and that was even more fun. I copied the layer with the mask on it and held the ctrl key while i clicked on the layer mask. This gave me a selection of where my mask was. I inverted the selection and hit the delete key which got rid of part of the image on that layer.
I then place the layer mask in the trash and made another one. This time i used a gradient in the mask but applied it to the other edge of the layer to blend that side. I then sharpened the file and converted it to black and white in channel mixer. I put the red channel all the way to the right and moved the blue channel quite far to the left. I used the green channel to lighten it up a bit in the midtones. A little border and done.
I will post another tomorrow with much fewer photoshop steps.
Subscribe to:
Posts (Atom)