Thursday, February 28, 2008

arena pano

arena pano
Wow, two post in one day. My wife has however reminded me that i should be doing real work and as usual she is right, so two is it for today (ha).
This shot is made up of 49 seperate images. All were shot hand held also. There was more foreground and ceiling in the final composite but i cropped it in a fair bit. This allowed me to keep the celindrical feeling but let the court occupy a larger space in the image.
I started by using autostitch (www.autostitch.net) to create the pano. I then did some retouching as there were about 10 people on the court that i wanted removed.
I duplicated my background layer and turned it to black and white so i had the black and white layer and a color one underneath. I put a layer mask on the top layer and painted in black on it to allow the color court to show through while keeping the rest of the layer in black and white. I sharpened it up a fair bit and i think that was it.
Now back to some real work, or off to bed, well see.

faceit fun

Photobucket
I had to do a studio shoot today of a lady and grabbed a friend of mine to stand in so i could test the light. I composed and shot this image as you see it on the left half of the photo. I used a large softbox quite close to him for the light which is very untypical for me. It was set up (thanks joy) and i just didn't feel like changing it.
Anyway, i liked this image and liked it even better after i had some fun with it. I just created another canvas of the same size (select your original canvas and go to edit - copy, then when you go to file - new the size will already be there for you so you can keep it the same), and went to image - rotate canvas - flip horizontal. I then expanded the canvas size of the original and while holding the shift key dragged the new flipped image onto the original. I slid it over , put a border on it, cropped off the excess and was done.

Wednesday, February 20, 2008

smart objects win everytime

poker
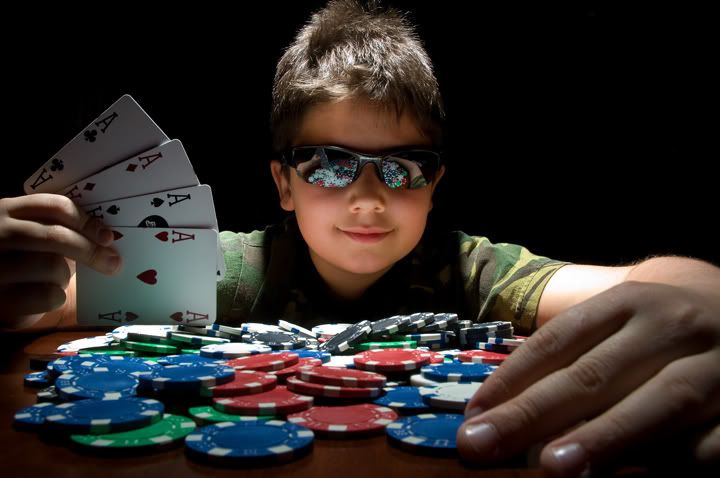
We had a little fun game of poker tonight and while the chips were still down i bravely asked the question to my son, "hey, do you mind if i take a quick shot". You never know how that ones going to go but tonight it was a yes. I knew i had about 1 minute so i quickly grabbed a flash, threw a pocket wizard on it and one on the camera, set the camera on self timer and set it on the table with the lens propped up on a stack of poker chips. I hand held the flash just over his head and pointed straight down at him and the chips. I really liked the shot in camera but his hair and the chips were a bit too bright and his face was a bit dark. Into photoshop we go.
I opened the raw file in camera raw and set the exposure for his face. I held down the shift key which changed the "open image" button to "open object". I opened it as a smart object and then when back into bridge and opened the same raw file again but this time adjusted the exposure for the hair and chips (much darker overall than the first one). I again held down the shift key and hit "open object". Once both versions were open i combined them into one by holding the shift key down and dragging one onto the other. Next i blended them together by using a layer mask on the top layer. My top layer was the dark image so i painted in black on the layer mask over his face and cards to see through to the brighter layer underneath.
I ended up tweeking the brightness of both layers by double clicking on the layer which, because they were smart objects, brought me into the camera raw plug in again.
I flattened the layers at the end, retouched a bit, and then sharpened.
My sharpening technique this time was to go under image - mode and convert the rgb file to lab. Once in the lab color space i went into my channels pallate and clicked on the lightness channel. I applied an unsharp mask at an amount of 270, radius 1, and threshold of 5. I then went back to image - mode and clicked on rgb to change back the my original color space. Sharpening this way will affect your textures but not your color.
Oh, and to cap the image off i went under image - adjustments - hue/saturation and added about +12 saturation.

Monday, February 18, 2008

door removal

Photobucket
Above is the finished version of this team photo. Well almost finished. I have another version where i sharpened and burnt (midtones) down the faces and front row a bit. I also did a curve to put a bit of magenta in the shadows and a bit of blue in the midtones. Below you will find the raw file right out of the camera.
As you will notice, the background was a little distracting. I decided to remove the door and banners as well as the exit signs and pipes on the walls.
To do this i just duplicated the background layer and did all my retouching on the background copy. I used the clone stamp to cover over the door with parts of the wall. I went right over the players heads that were close to it so i knew it was all removed. This took a bit of time as it was hard to make the lines on the wall line up. I also used the healing tool to get what i needed. When i had the door and banners and everything else removed i then duplicated the background layer once more. I put my retouched layer in between the background and the second background copy. So now when you look at the image you see the not retouched version. I added a layer mask and paint in black over the door and other things that i removed. This let the retouched layer show through wherever i painted in black.
I flattened the file when i was done and added a vignette to darken the edges a bit. I also used my burn tool set to midtones and about 10% strength to go around the edges a little more. Below is the original photo.
Photobucket

Friday, February 15, 2008

snow day

Photobucket
All it has done this winter is snow. I have been looking around and thinking, that would make a good photo, that would make a good photo, etc, etc. I walked outside my work building today and decided to finally take a winter shot.
Not much of a shot really but thought i would post it just the same.
I converted it to black and white by going to image - adjustments - black and white.
I hit ok and then went into edit - fade and faded my black and white conversion to 85% so just a hint of color would be left in.
Sharpened and saved.
Have a great weekend.

Monday, February 11, 2008

hdr combo

Photobucket
The above image was shot in a very dark arena (turned into a convention room). I photographed the event and then at the end, when the premier was speaking, I took my tripod to the back of the rink and bracketed over a 7 stop range.
On the normal exposure for the crowd, the speaker and screens were blown out. Normal for the speaker put the crowd way too dark. It took way over exposing both to bring up the red you see on the curtains as they were just these little led lights.
Another perfect candidate for photomatix.
Photomatix did a very good job at getting the entire image close but where the crowd moved a bit they got a little funky. Also the speaker and screens were still a bit light. To fix this i opened the photomatix tonemapped image, one of the original exposures where the stage was properly exposed, and one where the crowd was properly exposed, in photoshop. I used the photomatix image as my background and then using the move tool and holding the shift key down i dragged the other two images, one at a time, onto this background image. I created a layer mask on both of the top two layers and filled them with black to hide all of those layers allowing only the background to show through. I then painted in white on the layer mask to reveal the stage on one layer and the crowd on the other. Make sure you use a really soft edged brush so it blends in well.
This is an extremely easy task as layer masks could not be easier. If you make a mistake just paint over your troubled area in black and it is fixed.
Oh, and if your showing a friend your final version make sure that you leave your layers pallate open so they can see all your layers and masks. Its impressive to someone who doesn't know much about photoshop (ha).

Sunday, February 03, 2008

photomerge

Photobucket
Sorry for my absence. I have had a very busy january, which while is very good, has kept me off the computer having fun.
The photo above is of a local bakery. If you are local or are visiting fredericton then go to the happy baker. Great coffee and even better baked goods.
Anyway, the store and bakery occupy a narrow long space which was very difficult to capture in one shot. I put the camera on a tripod and took 4 or 5 vertical shots (sorry cant remember exactly)to cover the whole store. I opened bridge and selected the shots i wanted stripped together and then went up to tools - photoshop - photomerge. I was very surprised at how good a job it did. It was way better than in cs2. The only problem i had was that there was a blurry guy at the back of the store. When photomerge creates your pano however, it uses layer masks, so if you dont like something (like the blurry guy) then you can just paint in white on that part of the layer mask and remove him (he was only in one frame not all).
I retouched and removed some distractions and sharpened a bit.
The only other thing i had to do is fix up the carpet as there was alot of white flour tracks in it. I first selected the whole carpet using the lasso tool and refined the selection using quick mask. It took awhile but looked great. I saved this selection to bring it up again later. I duplicated my background layer and then sampled a nice dark brown from the carpet itself and loaded the selection I created earlier. I then filled the selection with this brown color. I lowered the opacity of this top layer so some of the texture would show through and was pretty well done.