Sunday, May 31, 2009

strobing

Photobucket
I shot an event this weekend at which the downtown blues band played.
It was a great event and the music was awesome. I set up two sb flashes up high on a balcony that ran around half of the main area. I aimed them at each other so i had cross light. I filled this light in with an on camera flash with a dome diffuser on it and set at a 45 degree angle. I fired the remotes with a pocket wizard. The light worked out perfectly. I dont want to post any photos as there were alot of government people there and they may not want their photos on my blog.
This shot is of the band with the strobes turned off.

Friday, May 29, 2009

poster

Photobucket
I saw this movie poster in the mall and immediately thought of an old farm house down the road from my house. I look at that house everytime i drive my son to scouts and it really looks like its straight out of the horror shows. I found a digital file of the movie poster online and downloaded it to start. My daughter kindly photographed this house for me as i pulled over to the shoulder of the road and watched nervously as cars raced by.
I opened both photos and then made my new shot black and white and boosted the contrast. I made a rough selection of the house plus a bit of the area around it and drug it over onto the poster. I transformed the scale to fit over the original house and then created a layer mask to hide the parts of my selection that i did not want to show, like the sky around it and grass and trees in front of the house.
I used my dodge tool set to highlights and dodged a couple of the windows and most of the siding to bring out what was already there. I used the burn tool set to shadows and went over the roof and chimneys to darken them down a bit.
That was really about it. I think it looks scarier than the original.
I would drop in and give the farmer a print but i am afraid.

Wednesday, May 20, 2009

lighting test

Photobucket
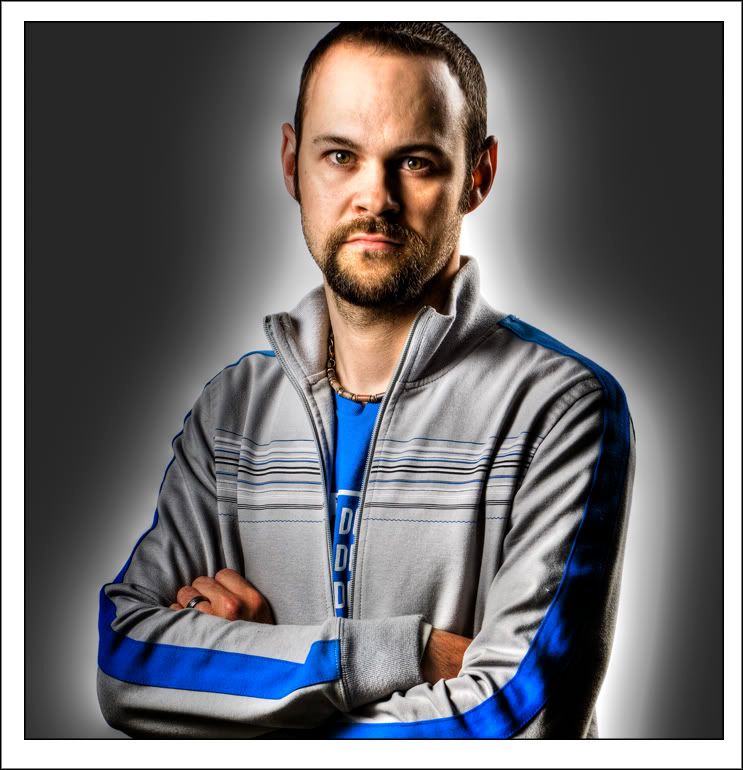
I had to do some 3/4 length head shots in the studio today and grabbed my buddy kev to act as a test model.
I set up three lights. Main was placed to camera left up high and shot through an umbrella, angle of light to subject was about 45 degrees or so. Side, hair, light was placed behind kev and up high also, shot through an umbrella. I shot one other light on the background, white seamless paper, to make it close to white.
I opened the photo in photoshop and used the dodge tool, set to highlights, to make the background white.
I next saved the image as a tiff and opened it in photomatix and ran it through details enhancer, i have posted before about how to do a single file in photomatix. Once it processed i tonemapped it and saved it as a tiff.
I opened it in photoshop and did a little trick to it to pump up the contrast. I duplicated the background layer and did a curve adjustment on the copy. I moved (straight across) the top and bottom points of the curve in to the third line, three squares. I then went under adjustments and hit desaturate. I then, in the layers palate, changed this copy layers blend mode to luminosity. From here you just have to lower the layers opacity, in the layers palate, to taste (mine ended up at about the 40% mark).
Then flatten.
I then wanted to make the background darker, it was very light grey, and create a halo around him. I duplicated my background layer and did a curve adjustment on the copy to darken it alot. You will see darkness come right into and over your subject but thats ok. Make a layer mask and paint in black with a nice big soft brush at about a 30 or 40% opacity. Just paint over the parts you want the lightness from below to show through. You can also lower the opacity of this dark copy layer if you like.
I flattened once more and smart sharpened 40%. I cropped and extended the canvas size to create a white border.
If you like this approach to creating extra contrast in your image you could always make an action.
Hit play and its done.
One thing i forgot to mention is that i also used the dodge tool, set to highlights, at about an 8% opacity on his eyeballs.

Sunday, May 17, 2009

gelled flash

Photobucket
I broke down and bought a new fancy pants flash last week and i got five minutes to play with it tonight. It came with a gel filter pack and an attachment that holds it on the flash and everything. In case you didn't know, it dosen't take much to impress me.
I put a full cto gell (orange) on the flash and set the cameras white balance to tungsten. What this does is make your flash lit subjects a daylight balance for color but throws your background, ambient light, blue.
I set the flash on a stand and zoomed the head in a bit and aimed it at the girls faces. I put it on ttl and used the pop up flash on my camera to trigger it. I set the on camera flash to not register and could use the cameras flash menu to adjust the power of the off camera flash. It was friggy to say the least but it worked. I ended up with the flash compensation set to -1. I just set the shutter speed for the brightness of the background, you could flavor to your own personal taste.
The girls did some funky poses and since some black flies wanted in on the action, the girls ditched me before i had the light tweeked just right.
My light was wacking the girl on the left in the face and falling off on the girl on the right, there by under exposing her by probably a stop.
I downloaded and converted to dng in lightroom and did all the corrections in the develop module. I cranked up the saturation a bit and put the clarity around 25 or 30. Once i had it looking alright i hit control - E , which opened the image in photoshop. Here i duplicated my layer and did a curve on the copy to darken down the left girls face. I added a layer mask and filled it with black to hide my darker adjustment. I then painted in white on her face, allowing the dark layer to show through, at about a 40% opacity on the brush and just built it up. I sharpened about 35% and was done.
I started to retouch the image a bit but had to go out and then ran out of time.
I will experiment with this approach again as i like the look.

Saturday, May 16, 2009

dancing queens

Photobucket
The scene you see is the tester for the dancing segment of my sons first house party. We set up the dancing area in the living room, complete with christmas lights, and my mom and daughter gave it a spin. The party has now been over for an hour and a half and the house is still standing, whew.
This photo was alright as is but i found the floor and my mommas legs a bit on the light side. I duplicated the background layer and did a curve to darken the whole photo. I then created a mask on this copied layer and filled it with black, to hide all of the darkening. I then painted in white on the mask with a nice large brush and an opacity of about 40%. I just built it up until it looked right.

Thursday, May 14, 2009

a few shoots

Photobucket
Anyone who follows this blog must have thought i gave it up or something. Not the case. I hit a very busy stretch once more and then the flu moved into my chest. I havent really had the computer on in awhile and am now a touch behind in getting a few photos out.
I had the chance tonight to look at some and thought i would just post a smattering of things i have shot lately.
I will give a brief overview of the images starting with the top left. This was for a brochure on downtown shopping, the shot on the lower right was part of this also. I had to take about 20 shots or so before i had the light looking right. I finally settled on one sb flash bounced into an umbrella and hitting the foreground subjects. I think i turned it a bit away from them also so the light was feathered a bit. This was placed to camera right. I put a flash on the background people and bounced it off the ceiling. It was placed to camera left and zoomed in a bit as not to spill on foreground.
On the bottom right image i had a flash bouncing off the ceiling to camera left for the people and one bounced of the ceiling for the background also to camera left.
The bottom left image was an hdr shot and i used 5 images run through photomatix.
The top right photo was just available light shot from a low angle with a 24mm lens.

Saturday, May 02, 2009

couplea things

Photobucket
We stayed at a not too far away hotel last night and our room had this nice high vantage point of the pool area. I had the camera on a tripod and bracketed 9 frames. I like doing 9 because i choose the first, last, and every second fram inbetween, giving me 5 images to export to photomatix.
I may have forgot to mention in previous posts on this subject that by default lightroom will export your images as 16 bit adobe rgb98 files. So when you save your tonemapped file as a nice big tiff and then open it in photoshop it will be 16 bit, rgb98.
Now if you want to save the image as a jpeg and pop it up on the web or send it to your local one hour lab for a nice big wall print then there are a coupla things you may want to do.
1) convert to 8 bit ..... image - mode - 8bit
2) convert to srgb ..... edit - convert to profile - (in the destination space choose srgb)
You are then free to save as a jpeg, use all your photoshop menu items that were greyed out in 16bit, and have good color reproduction from your lab and the net.