One of my students was trying to paint eyelashes on her portrait today with a grass brush. The brush was curved to the right and she needed it curved to the left and the angle changed as well, to match the eyelashes that were already there. I could not seem to figure it out in class but as usual i got it in about 5 seconds sitting in front of my home computer (i think it is because i have my magic photoshop slippers on ?????).
Go to the window menu and down to the brushes palette. Make sure you have the brush tool active in your toolbox. In the brushes palette click on the words
"brush tip shape".
You will then see many options that will change your brush.
I clicked on the "flip x" checkbox to make the brush curve to the left and then played with the angle circle to tweek it a bit more.
Good luck rebekah.
Monday, February 27, 2006
Wednesday, February 22, 2006
guru gord
I know that you are all now wondering who "Guru Gord" is and where you can see more of him.
The wait is over
www.gordophoto.blogspot.com
Gord and i have been best pals for years and he has helped me out on many computer and photoshop puzzles i have come up against.
He is afterall the Guru.
The wait is over
www.gordophoto.blogspot.com
Gord and i have been best pals for years and he has helped me out on many computer and photoshop puzzles i have come up against.
He is afterall the Guru.
Tuesday, February 21, 2006
save settings subset in camera raw
This one comes to you from guru gord.
This tip works with both CS and CS2. In Camera Raw, you can use the "Save Settings Subset..." which can be found here:
to save settings for things like a customized colour adjustment for your camera according to your tastes using the Calibrate tab. But you can save other things such as B&W conversion, cross processed effects, high contrast or ect... as well.
These setting can be quickly called up and applied to the image using the "settings" flyout tab or they will be available when you right click an image in bridge(CS2)
or if you are in CS ...right click and "apply camera raw settings" -then choose from the -"settings" flyout tab.
It's a real time saver if you want to quickly convert some images. These subsets can be used as-is or as a starting point for more precise adjustments afterwards.
Here's a cool one to try to start you off. I call it "Coloured Sepia"
Open an image in Camera Raw:
(ADJUST tab)
WB 43000
Tint +16
Exposure +0.55
Shadow 6
Brightness 56
Contrast +42
Saturation -80
(CALIBRATE tab)
Shadow +71
Red Hue +51
Red Saturation +65
Green Hue +7
Green Saturation -100
Blue Hue -76
Blue Saturation -20
If you like it then save the settings subset and call it "Guru Gords Coloured Sepia effect" or what ever you like. and enjoy!
Make your own and share them in the comments section.
Friday, February 17, 2006
removing lines
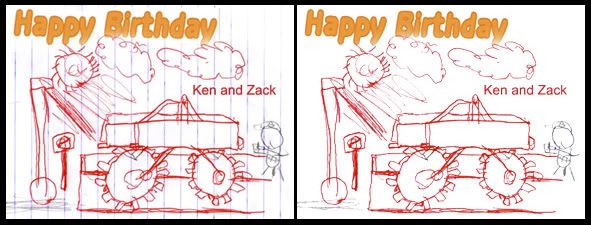
My good friend Zack's artwork for his upcoming birthday party is the inspiration for todays post.
When i saw the scan of the art i immediately thought "what would be an easy way to get rid of the papers lines".
He made it easy for me actually because he did not use blue anywhere in his drawing.
A quick scan of the channels (apple-1, apple-2, apple-2, or ctrl 1,2,3 for pc users) showed me that the blue lines dissappear in the blue channel.
Here is what i did.
- duplicate the background layer (for safety sake)
- go to the channels palette and click on the blue channel.
- drag this channel down to the create new channel box at the bottom of the palette.
- now go under image- adjust- levels (yes i know levels and not curves, just this once)
- bring the white and black sliders in towards the middle so your artworks lines show up better.
- now go to select - color range , and bring the fuzziness slider to 200.
- hit ok and inverse your selection (select - inverse).
- click back on your rgb channel (want to view them all at once) and fill with white (edit - fill - white)
- deselect and then go back to your channels palette and throw the blue channel copy in the trash (the level adjustment will throw off the color in the happy birthday text)
- lines should be gone.
- thanks Zack
Wednesday, February 15, 2006
comments
Please feel free to send comments at any time about this blog.
I was not moderating my comments and as a result the comment in the radial blur
post is not an actual comment but a link to a porn site.
I wanted to let you know so you can avoid it.
I am now moderating my comments so this will not be able to occur again.
You learn something every day.
I was not moderating my comments and as a result the comment in the radial blur
post is not an actual comment but a link to a porn site.
I wanted to let you know so you can avoid it.
I am now moderating my comments so this will not be able to occur again.
You learn something every day.
pausing an action
Peter Bauer from the NAPP help desk gave me the info for this tip today and i thought i would pass it on.
I was creating an action and assigning a function key so i could just hit the key and bam, work done.
I wanted to create a curve adjustment layer but I could not find a way to make the curves dialogue box stay open.
The action would work fine but i had to double click on the curve layer in the layers pallet to start adjusting the curve.
Heres how to make this work:
- open an image and then open your actions pallet (window - actions)
- click on the little arrow on the top right corner of this pallet
- scroll down to new action
- you can now name your action and assign it a function key, then hit record
- go to layer menu (at top of workspace) and scroll down to new adjustment layer - curves
- when the first box comes up hit ok and your curves dialogue box will open
- click ok (if you just want a unadjusted curve layer)
- now go back to the actions pallet and click stop (found at the bottom left corner of the pallet)
- If you hit the play button now (two over from where you hit stop) a curve layer will be added but will not be opened
- in the actions pallet click the "toggle dialogue on/off" box (found to the right of the check mark) next to the curve addjustment state that you created.
- this will cause the curve box to remain open when you apply the action.
- do your adjustment and hit ok.
actions are great time savers. I currently have one for rotate canvas cw, rotate ccw, smart sharpen 30%, 40%, 50%. 60%, convert to srgb, and create a 1 pixel border around my image (for passports).
Monday, February 13, 2006
channel blending
Here is a great tip for saving a weak channel.
Open an image that contains something red (ex: fall leaves, strawberries, persons face, etc.).
Take a look at the channels by using apple or alt (pc) and 1 (red), 2 (green), or 3 (blue).
You can get back to the full rgb preview by hitting apple - tilde (~).
You should notice that the reds in the image show as white in the red channel with not much detail in them.
If you look at the green channel you should see some detail and texture in these areas.
Blue usually looks quite broken up but look just to make sure.
What we are going to do is put some of this detail from the green channel into the red channel.
First duplicate the background layer (drag the background layer down to the new layer icon in the layers pallet.
Next, with the background copy layer highlighted, hit apple or alt 1 to preview the red channel.
Now go up to the image menu and down to apply image.
In the layer box choose background, in channel box choose green (because this is the channel we want to take the info from), and in the blending box choose normal (you can play with different blend modes later).
Hit ok and then hit apple - tilde to get back to the full rgb preview.
In the layers pallet change the blending mode of the background copy layer to luminosity, very important.
Then lower the opacity of that layer to 0 and bring up gradually.
You should see quite a difference in red detail.
Friday, February 10, 2006
filter settings
This is a great tip from one of the masters, scott kelby.
When using a filter (ex: i tried it on the sketch filters) and you want the settings you apply to remain (they will reset to the default settings everytime if you dont change them), just hold down the command key (mac) or the ctrl key (win) and the cancel button will change to a default button. Click default and these settings (your favourite of course) will remain until you change them again.
When using a filter (ex: i tried it on the sketch filters) and you want the settings you apply to remain (they will reset to the default settings everytime if you dont change them), just hold down the command key (mac) or the ctrl key (win) and the cancel button will change to a default button. Click default and these settings (your favourite of course) will remain until you change them again.
Wednesday, February 08, 2006
radial blur
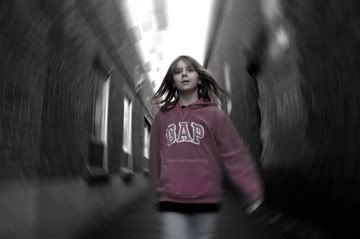 I was playing around again last night with a photo i had taken on the weekend and ended up with a cool effect. The first half comes to us from photoshop user magazine (dec 05) and the second half from yours truly.
Open photo you want to use. Works well with images with subject in middle of frame.
Press command - j (pc: control - j) to duplicate the background layer.
Go under filter menu, under blur, and choose radial blur.
Enter 6 for amount, choose spin for blur method, and best for quality.
Click ok to apply.
We now want to restrict the blur to where you want it.
Click on the add layer mask icon at the bottom of the layers palette.
Choose the brush tool and set foreground color to black.
Choose a medium sized soft edged brush and begin painting over the parts you dont want blurred (the girl in this photo).
This will mask out the blur. If you make a mistake and paint over something you do want blurred just hit your x on the keyboard (will put white as the forground color) and paint over what you had painted black.
Flatten the layers.
Hit command - j to duplicate the background layer again.
Choose image - adjust - desaturate.
Now hit the layer mask button again and paint in black with a low opacity (i used 24%) over the parts of the image you want the color to show through in.
Monday, February 06, 2006
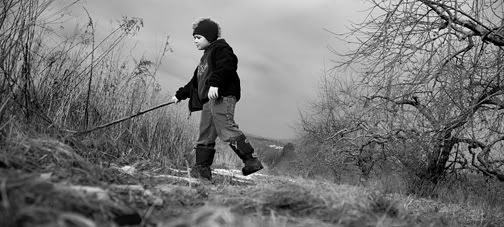
straighten a photo
This is a really easy little trick.
If you want to straighten your photo, either by using an edge or a horizon line or anything in your photo, we will use the measure tool (under the eyedropper).
Just click and drag the tool along the line you want to become straight.
Let go of mouse at end of line and then go to image - rotate canvas - arbitrary, and you will notice that there is already a value set. This is the value required to make that line straight.
Hit ok and watch your image rotate.
Works every time.
using threshold
You can use threshold to find the lightest part of your image (you want the lightest part with detail, not a reflection or specular highlight) and darkest part.
This comes in handy when you use the eyedroppers in your curves dialogue box.
To do a quick correction for contrast you can use the black eyedropper to set your black (anything the same tone as the pixel you click on or darker goes to black) and use the white eyedropper to set your whites.
Before we get back to threshold heres what you should do.
Go into layer - new adjustment layer - curves. Once you are in the curves box, double click on the white eyedropper. This will bring up the options for this tool. By default it is set to pure white (255) and we want to set it to give us white with detail.
Here are the settings you should start with:
H:0, S:0, B:94, R:240, G:240, B:240, L:95, a:0, b:0, C:4, M:3, Y:3, K:0.
If you think that after using these settings your whites are not white enough just change the R, G, B, numbers higher (up to 249).
The same goes for the black eyedropper (default is 0), if you want some detail just move the R,G,B, values up between 10-20.
So now that all our options are set and we know how the eyedroppers will work we can go back to using threshold to find our lightest and darkest area.
Go to image - adjustments - threshold.
Move slider all the way to the left. Now bring it back to the right until a bit of black appears. This is the darkest part of your image. Shift - click on that part of the image to set a color sample so you will know exactly where the darkest part is.
Now move the slider all the way to the right and then bring it back until some white appears.
Shift - click in one of these areas to set another color sample.
You can now cancel out of threshold and you should see to targets on your image.
Now go to your curves dialogue box and shift - command - click on these target areas and it will set these points on your R, G , and B curves.
You can now adjust these areas.
To clear the color sample targets just go the the color sample tool (in toolbox under the eyedropper) and go up to the options bar and hit clear.
These keyboard commands were for a mac computer.
Sorry to be so long winded tonight.
Friday, February 03, 2006
apples
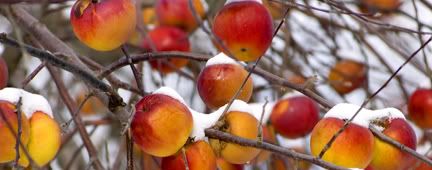
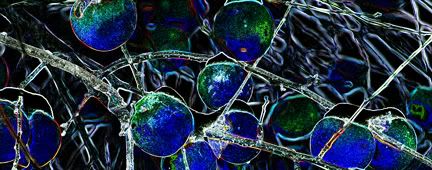
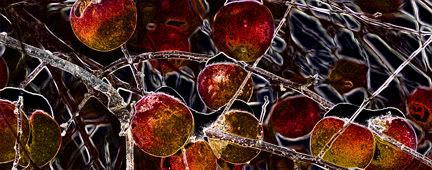
This effect was done using the find edges filter.
Here are the steps i took:
- open apple photo
- duplicate background layer
- filter - find edges
- image - adjust - invert
- select all
- change top layers blend mode to luminosity (keep opacity at 100%)
This gave me the blue apple photo.
To make the red apple photo i just desaturated the top layer.
Note: try different blend modes. Who knows what you will end up with.
Thursday, February 02, 2006
photo test
I just signed up at photobucket.com so i finally have a site where i can store my photos for this blog.
All that text was getting pretty boring.
This is just a fun orchard photo
Guru Gord
I have asked my pal "guru gord" to write a tip just for my blog.
He has agreed and is in the process of writing it.
In the meantime you should check out his blog which has some way cool stuff in it.
www.gordophoto.blogspot.com
He has agreed and is in the process of writing it.
In the meantime you should check out his blog which has some way cool stuff in it.
www.gordophoto.blogspot.com
Wednesday, February 01, 2006
reselect
Lets say you are working on an image and you spend some time making a great selection of something. You then eventually deselect and continue on with your work on the image. Lets say it really needed some work and 50 history states later your done. Or almost done. Whoops, I forgot to save that selection and now I really need it reselected to do just one more thing. Just one more i swear.
Go to your select menu and sown to reselect. Problem solved.
Just so you know I did two more corrections after I reselected, sorry.
The tips for today are by Matt Kloskowski. Say that three times fast
Go to your select menu and sown to reselect. Problem solved.
Just so you know I did two more corrections after I reselected, sorry.
The tips for today are by Matt Kloskowski. Say that three times fast
sample all layers
Want the ability to do all your retouching on a blank layer??
Create a new layer in your layers pallet.
Now with that layer (blank) selected, choose either your spot healing brush, healing brush, or clone stamp.
If you try to retouch on your new layer it will not work.
Look at the options bar for the tool you have chosen and check the box beside "sample all layers" (by default it is unchecked). You can now retouch away and have all your corrections happening on the blank layer.
The benefit you ask? You can now lower the opacity of that top layer to make the retouching look more natural.
Subscribe to:
Posts (Atom)