Wednesday, May 30, 2007

desaturate, a bit

Photo Sharing and Video Hosting at Photobucket
I finally got to the orchard down the road tonight. I have been trying for over a week but just cant find the time.
I love landscape images but i dont think i am very good at them. People are my thing i guess.
Someday i hope to get better with the scenics.
Anyway lets get to what i did here.
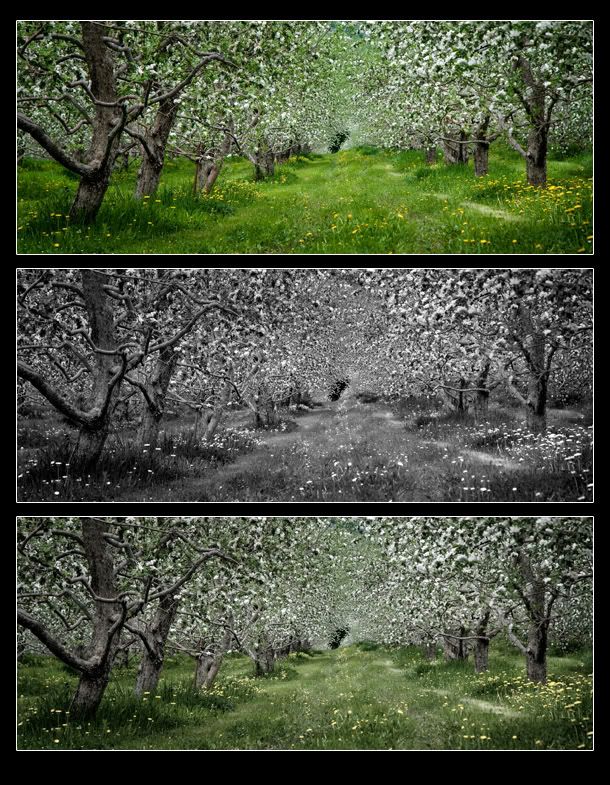
It was a cloudy evening so first i started by adding some contrast. I used a curve and after that used apply image to put some detail from the red channel into the green channel as it was washed out and weak. (if you read one of my older posts you will find the apply image technique). I then darkened the edges of the photo in a vignette effect. I also used the dodge (set to highlights) and the burn (set to shadows) and lightened some of the lighter patches of grass and darkened some of the darker patches. I sharpened it alot as it was soft.
All this got me to the top photo.
Using photoshop cs3 i then went under the image menu and down to black and white. Under the presets drop down menu i chose "high contrast red filter".
That go me to the middle photo.
I then went under the edit menu and down to fade. I put the slider on 50% and that got me to the bottom photo.
I like all three images but thought over all the bottom would be my pick overall.

Tuesday, May 15, 2007

workflow2

Photo Sharing and Video Hosting at Photobucket
Just a couple cows in a field i saw while driving home from a recent shoot.
I wanted to go over the workflow for this image starting with taking the photo itself.
When i saw the scene i knew right away that it would be a panoramic. I also made the choice not to include any sky in the shot. It was an overcast day but i knew as well that i would be adding a bit of contrast later in photoshop. These decisions were step 1 in this images workflow.
Step 2 was downloading the raw image using nikon view 6 and then viewing it in adobe bridge. I have now been adding keywords and a description in bridge as i will archive them later. I then processed it in camera raw, mainly exposure, shadows, tint, temperature, and vibrance, and saturation.
Step 3 is opening the image in photoshop. I cropped the file first and then added a new adjustment layer, curves.
I adjusted the curve to make it look half decent and then sharpened the file 100% with smart sharpen (lens blur, more accurate). I used a combination of the healing tool and clone stamp to clean up any bright blades of grass and get rid of some cow pattys.
Step 4 was saving the file and i was done.