I do not have much time tonight but still wanted to add a tip.
I had to brighten up some yellow teeth today and thought i would pass the approach along as it was still fresh in my mind.
Select the teeth, i use the lasso tool. Go to image - adjust - hue/saturation.
Here go to the yellow channel and raise the lightness up a bit, also you can lower the saturation a bit. Quite easy.
Monday, March 27, 2006
Saturday, March 25, 2006
image size
My paperboy and good friend dana was looking for some advice yesterday on making a digital file larger in printable size.
I thought i would share some of that advice.
If you want to make your image bigger in height and width:
1) go to image - image size
2) make sure constrain proportions is checked
3) if your files resolution is higher than 200dpi then uncheck the resample image box and change the resolution to 200dpi.
4) hopefully that will get you close to your target size but if not, check the resample image box, set the dropdown menu to bicubic smoother (it should be on bicubic by default), and start scalling upwards in size in 10% increments.
5) after you hit ok to the first 10% adjustment you will have to go back to image - image size and type in the next 10% jump and also set the dropdown menu to bicubic smoother again (you can set a new default by going in to photoshop preferences under the general tab and change it if you like).
If you want to make your image smaller with the image size dialogue box:
1) go to image - image size and check all boxes.
2) set the dropdown menu to bicubic sharper and type in the dimensions that you want.
Personally i just use the crop tool and set the size i want in the options bar when i am shrinking something.
Monday, March 20, 2006
podcasts
I talked to my students today about our relationship soon coming to an end. I did not see any tears in the crowd and one girl didn't even know i was in the room let alone speaking (you know who you are).
My point in all this is that they will have to start finding resources for advancing their photoshop knowledge on their own. As photographers, photoshop will be an invaluable tool. They don't believe me yet but they will before long.
One resource i have used myself lately is podcasts. You can download itunes from
www.apple.com
and then go to the podcast link on the left hand side. Then click on the words "podcast directory" at the bottom of the page. Scroll down a bit until you see the search space and type in these names to start you off:
- russell brown
- photoshop tv
- photoshop tips
In the photoshop tips you are looking for matt kwoskowski killer tips.
I subscribed to them all (free of course) and just double click the subjects you want to watch and click on the little video window at the bottom left of the itunes screen and it will become bigger.
Watch and learn.
merge to hdr
i have been playing with merge to hdr recently and have been encountering a few setbacks. I will not go into elaborate detail here on how to use hdr as instructions for it are all over the place.
For a good tutorial go to
http://www.luminous-landscape.com/tutorials/hdr.shtml
One thing that no one seems to make obvious is how to convert it to a 16 or 8 bit file after you have it saved in a .pbm format. This is easy when you think of it but when you are having trouble to begin with its just one more pain.
After your computer does its magic and you have set the white point slider to where you like it and then hit ok an image appears, magically of course. You then save this file (.pbm extension) and close it. Well you really dont have to close it but i did so you might as well too. Open this file and go to the image menu - mode - and down to 16 or 8 bit. After you choose one and click on it a window will appear which is where you set the mode to local adaptation and adjust the curve.
Now that i've got this far i cant seem to make the image look good using the curve. I will try it again tomorrow. Keep your fingers crossed.
Monday, March 13, 2006
cute photo
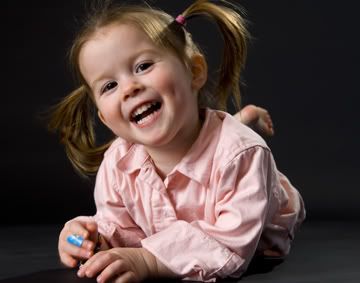
Just wanted to post a cute photo i took on the weekend.
I turned my living room into a studio for a couple hours.
I used two lights, one pointed at her from behind on the right and
the main light was to the left with an umbrella.
I had to put some cardboard around the back light to contain
the spill and thats about it.
Wednesday, March 08, 2006
saving actions
My buddy, guru gord, has come through for me once again.
I wanted to create an action to send to him but i could
not figure out how to save it as the save action command was
greyed out.
Heres how to save an action:
- go to window menu - actions.
- click on the small triangle in the top right corner of the palette.
- go to "new set".
- name it what you want and hit ok.
- go to triangle again and down to "new action".
- name it what you want, give it a function key if you want, and hit ok.
- create your action and when done hit the stop button at bottom left of
actions palette.
- click on the action set you just created in the actions palette (not the action) to highlight it.
- go back to the triangle and down to "save actions".
- a save as box will come up and you can put it in a folder somewhere on your computer.
This will result in a .atn file that you can send to friends or save for future use.
For them to load this action here is the roadmap:
- mac: just double click on the .atn file and it will go into your actions palette.
- win: go to the triangle again and down to load actions. Navigate to the .atn file and click on load.
(if you want to know where your .atn files can be found to to my computer, adobe, photoshop cs2, presets, photoshop actions).
car photo
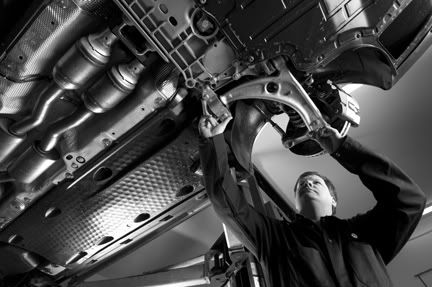
My main reason for this post is just to break up the boredom of text
with the addition of another photo.
I did this one recently for a local volkswagon dealership.
I converted it to black and white in the raw plug in box.
Retouched it a bit.
Dodged the left side of the face (our left) with the dodge tool set to highlight mode
and set to 18%, just to bring out that side a bit more.
I smart sharpened and i was done.
Monday, March 06, 2006
border for cutting
I often will drag images to a new canvas for printing.
I can do a small area crop to print so i can save both ink and paper.
Just start with a new file that is 8x10 and the same dpi as your images you want to print. Crop your photo and flatten the image. Drag the photo to the top corner of the page and do a print. Assess it and if changes need to be made just do two steps backwards to your original photo and make your changes. Crop and flatten once again and drag the photo onto your printing page so it sits beside your first test. You can now either just hide the first tests layer or drag it to the trash.
I find when i make my final print, if the background or any part of the photo is white and is touching the edge, i never know where to cut it because there is no seperation between the photo and the white paper.
Make a small border for a cutting guide.
- select - select all.
- select - modify - border and enter 1 pixel.
- edit - fill and fill with black.
- select - select all.
Then you can drag this file to the printing page and see where it ends.
I have an action made for this process so i just need to hit a button and it is all applied.
b&w conversion
There are many ways to convert an image to black and white.
Here are some.
1) If shooting in raw mode just move the saturation slider all the way to the left in the raw plug in window. You can then go into the calibrate tab and adjust the sliders to your taste.
2) Go to the image menu - adjustments - desaturate.
(note: i have typically used this method and then just applied a curve)
3) Go to image menu - adjustments - channel mixer. Click on the monotone check box and then start to play with the sliders.
4) Go to layer menu - new adjustment layer - hue/saturation.
Move the saturation slider all the way to the left.
Go to layer menu - new adjustment layer - hue/saturation and create a second adj. layer.
Hit ok when the box pops up.
Drag this layer under the first hue/sat layer in the layers palette.
Change blend mode to color (second hue/sat layer only).
Now double click on this layer and play with the hue and saturation sliders.
I also added a curve adjustment layer to the top of the layer stack and bumped up the contrast a bit.
I just applied this method to 10 wedding reprints and it worked great.
My settings were hue -32, sat +2.
I did need the curve for contrast.
Saturday, March 04, 2006
new type layer
This tip was just posted on another blog i read.
If you are creating multiple text layers in a document sometimes when you click in your photo with the text tool it will just put the curser into a previous text layer and not create a new one. If this happens just hold the shift key down when you click in your photo area and a new layer will be created.
Another way to do this is to duplicate one of your text layers and then double click on it in the layers palette to alter it. It will all highlight and you can start it over from scratch.
choose layers
Sorry for the slowdown in posts.
I have been very busy lately shooting and have not been able to type.
Todays tip is a short one but nonetheless very important.
If you are combining multiple photos together (which i do alot of) sometimes it can be hard to select the layer you want to work on in the layers palette.
For example i have photographed 130 people individually before and placed them into one large group photo. Try to find the layer of the guy in the red shirt in the second row. They all have red shirts on by the way.
Forget about the layers palette and just apple click on the guy in the photo.
Presto, layer is selected and ready to alter.
Subscribe to:
Posts (Atom)