Wednesday, August 27, 2008

room blending

Photobucket
I had to get a couple room shots ready for a local hotel and spent way too long last night working on them.
I shot all ambient light and bracketed both rooms over 7 exposures.
I chose the best overall exposure and then drug the other exposures on to it to create a file with about 3 layers, i did not use all the exposures. For example in the above photo i used one exposure for the crowd, one for the stage and screens, and one for the red lights on the curtains. I used layer masks to hide or reveal the parts of each layer that were the proper exposure. It all blended in quite nicely. I used a tripod while shooting as i knew i would be doing this later.
I also tried the images in photomatix but was not happy with the results.
Photobucket
This was the second room i did and i basically did the same thing as i did in the above photo. One exposure was the tables, one the screens, and one was the walls and ceiling. I even masked the table candles to a darker exposure on a layer underneath.

Monday, August 25, 2008

photo borders

Photobucket
This is just a quick post on how to create a nice clean border quickly.
I applied this to a high res, full frame image from my d300, just to give you some sizing background.
I used image-canvas size and entered .3 in the height and width box. I had clicked on the relative box before (this just means that you can punch in a number and that will be the size the canvas is extended) and chose white for color. I now have a .15 white border all around my image. I hit ok and then opened it up again. This time i entered .1 in the two boxes and chose black for the color.
Photobucket
For this image i used canvas size once again but this time i clicked on the center bottom arrow in the canvas size dialogue box. This means that only the top and two sides will be extended, not the bottom. I entered .3 for the height and .6 for the width. I chose black for color. I then opened it up again and clicked on the center top arrow. I entered 1.5 in the height box and left the width empty. I now have a .3 border on the top and two sides and a 1.5 border on the bottom. I used my text tool , lowered the opacity of the text layer a bit so it blends in and was done.
If you do this often i would suggest creating an action, then you just have to hit a button.
I did the wonky color on purpose here by the way.
Just trying something different.

group retouching

Photobucket
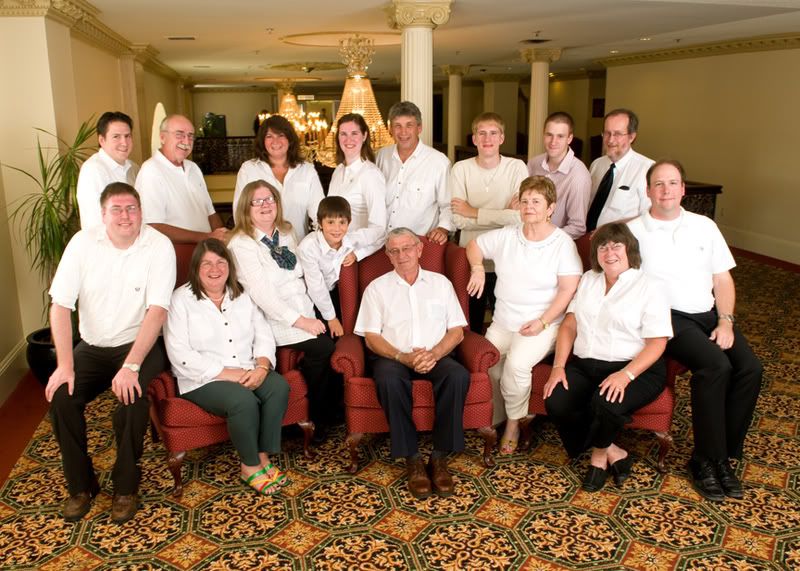
The above photo is one i did recently for a recent co-workers fathers 80th birthday.
They were having supper with the entire family at a local hotel and wanted a group shot taken before they went in to eat.
The lobby was crazy busy so i set up two strobes in an upstairs spot overlooking the top of the main lobby. It was the only spot available and although i was not entirely happy with it i had no choice.
This top photo was straight out of the camera (cropped is all).
Photobucket
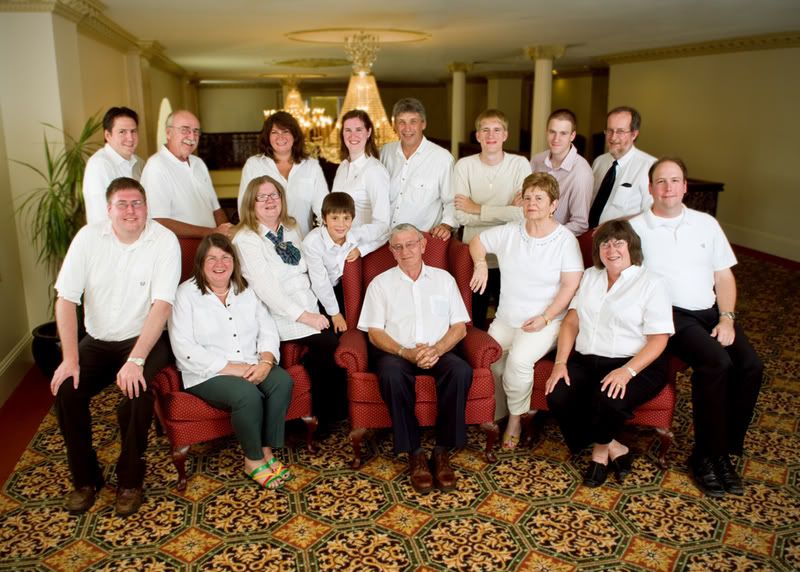
This is the retouched image. I started by retouching out all the distracting elements, like sprinklers, ceiling vents, people and wall plaques in background, and of course the oh so huge pillar just behind the group. For all of this i used a combination of the clone stamp and the healing tool. I usually try to clone first and then blend in the results with the heal tool.
I also wanted the family to stand out more than the background so i duplicated the background layer and applied a gaussian blur of about 2.5. I then used a layer mask and painted in black over the family so the underlying layer would show through leaving only the background of the image blurred.
I also used the liquify filter on the lady sitting on the arm of the chair to the right of center. I had placed her there and it may not have ended up being the most flattering of poses for her as her tummy was all bunched up. I tucked it in a bit as well as her arm. I sharpened the image and applied a curve for color. Not sure if i like the color curve now or not. May be a bit green. I stared at my monitor all day and i think this can hamper your color correcting abilities.
One more note on the retouching. I used the square marquee selection tool on the left side of the circle on the ceiling as the right side was hidden by the pillar. I then hit edit-copy and paste. I then went to edit-transform-flip horizontal and drug the copy to the right side of the circle.
Photobucket
One of the ladies told everyone to wear white, which i cringed at when i saw it initially.
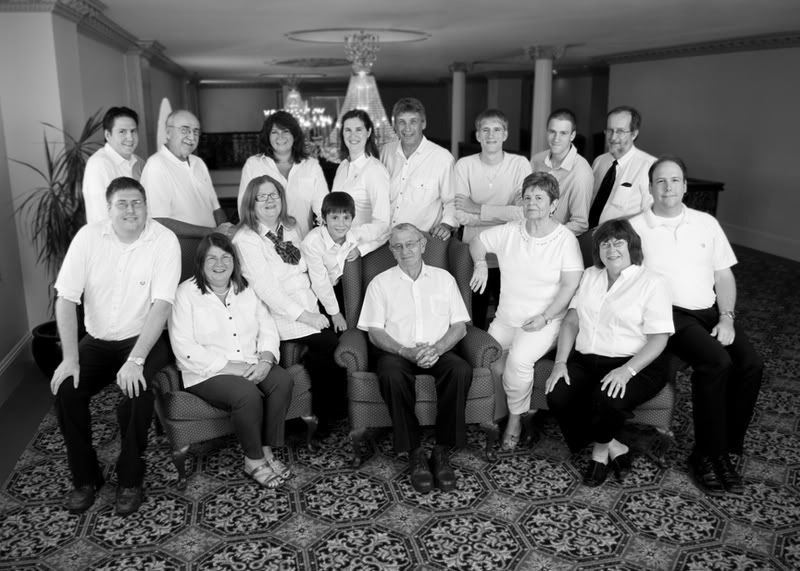
I thought if i converted it to black and white it may become more balanced and subdue the pattern in the carpet a bit.
This shoot was a prime example for me that the shoot is only half of the job. I spent a good part of my evening preparing it in photoshop. Remember this when quoting on a job.

Friday, August 15, 2008

adjusting the background

Photobucket
I took this photo tonight of one of my neighbors.
She did a bit of modeling on the sidewalk and i managed to snap off 63 frames.
I had a fairly shallow depth of field ( i think about f4) and i used a 200 lens for compression.
Once in photoshop i wanted to see if the background would look better if i blurred it a bit more.
I duplicated my background layer and then hid my top layer (background copy). I applied a gaussian blur of about 20% to the background layer. I turned the top layer back on and applied a layer mask to it which i then filled in with black. Then i painted in white with the paint brush where i wanted the blur on the underlying layer to show through (the whole background in this case).
This left me with a mask of a white background and the girl in black. To make her stand out a bit more i went to adjustments - hue/saturation and desaturated the background layer (only affecting the background because of the mask) and desaturated a bit, mabey 25%, cant remember now.
I then clicked on the top layer (will affect the girl only because of the mask) and added about 15% saturation to give her more color.
I sharpened the file, flattened it and was done.
One thing i noticed is that you can really tell how close your mask is to your subject if you take the saturation of the background layer all the way down. If you missed a spot or if you just didnt get close enough then you will see it clearly. Just cancel out of hue/saturation if this is the case and paint some more in white where you missed the first time.
One thing i notice about the photo after looking at it again is i find it fairly flat. I am not happy with my color and contrast adjustments i did in camera raw.

Thursday, August 14, 2008

lobster shanty

Photobucket
This is another pano from my PEI trip.
This is where we stayed with our soccer team.
Only advice is dont eat there.

Wednesday, August 13, 2008

football portrait

Photobucket
My son got his football gear tonight and a portrait was in order.
I set up a sb flash behind him and one to camera right at about 45 degrees. Both were pointed directly at him and on manual.
The image to the right is what came out of the camera.
The image to the left was achieved by first opening the image in camera raw and opening into photoshop as is.
I then opened the image into camera raw again and took the vibrance, clarity, fill light, recovery, and contrast to 100 percent.
I then took the saturation to 0, making it black and white.
I adjusted the exposure and blacks to get the photo looking how i wanted.
I opened it and then placed the original color image on top of the black and white image.
So now i have one image opened with the color top layer and the black and white bottom, or background, layer.
I clicked on the color layer to activate it and changed its blend mode to overlay.
I then took the opacity down to 62%.
I flattened the image and smart sharpened.
I then retouched the light stand using the clone tool and healing brush (just do it rough with the clone and then blend it in with the heal).
That was it.
I have two more panos in the cue for tomorrow.

another pano

Photobucket
As per my theme for the month, here is yet another pano.
This one went together fine.
I think i will look for a nice sky photo to strip in and i will post it again.

Tuesday, August 12, 2008

360 pano

Photobucket
I tried a 360 degree pano and here is how it turned out. The first frame i shot ended up being the center of the pano.

Sunday, August 10, 2008

pano month

Photobucket
It looks like it might just be pano month for me. For some reason i am enjoying playing with the photomerge feature in photoshop. This is one i shot this weekend on prince edward island while on vacation. We were at a really cool beach on panmure island.
This is a 180 degree pano stripped together in photomerge. It did not do a very good job on this one and i did a bunch of masking to correct the flaws.
If you look at this one and my last pano (alley) you will notice that i have been trying to get fairly close to my subjects so the middle of the pano looks like a point.

Thursday, August 07, 2008

overlay blending

Photobucket
I coulden't decide whether i liked this photo as it was shot or after it was run through photomatix better, so i combined the two.
I ran the image through photomatix and opened it in photoshop. I then opened the normal image and dragged the photomatix one onto it. I then duplicated the normal layer. So i now have the photomatix layer on top with two normal layers under it.
I clicked on the photomatix layer and changed the blending mode to overlay. I then merged this layer with the normal one under it. Then i lowered the opacity on this new combined layer to let the normal one under it show through until i had the look i wanted.

alley photomerge

Photobucket
I did a photo shoot last night of my niece and her three friends (late birthday present from me).
We were looking for some cool locations and found that in a downtown alley.
I thought i would try a pano using available light and above is the result.
The alley was about 7 feet wide and the wall your looking at is straight.
I took 5 photos hand held and shot vertically then stripped them together in photomerge.
I will be posting more images from the shoot later using 1 off camera flash.