Friday, December 17, 2010

closer hdr

Photobucket
I shot a couple angles of the windows i shot last night and this is the close up.
I processed this one to look a bit more like the typical hdr images you may have seen around.
I used a 7 image bracket and then in photomatix combined 3 images.
Photomatix can be a little bit of a guessing game with all the sliders it offers so i thought i would post my settings for this shot.
Strength 100, color saturation 63, luminosity +6.3, monocontrast 100, smoothing low, white point .926, black poing .111, gamma 1.090.
I then brought it into photoshop and sharpened, did a curve to boost the contrast a bit, and added saturation as i wanted the colors to really pop.

Thursday, December 16, 2010

nighttime hdr

Photobucket
I haven't done many hdr shots in awhile.
I had to shoot windows of downtown stores tonight and this is certainly one of the nicer looking stores on my list.
I decided to shoot an hdr of it and used three of the 9 exposures to make the image.
The only other thing i did was retouch the top of the image a bit and apply a vignette and sharpen.
My fingers are just warming up.

Wednesday, December 15, 2010

happy holidays

Photobucket
We had a great year and hopefully you did as well.
Happy holidays to all of you that frequent this blog.
For this fun family photo i combined two different shots to use the best of both.
The camera was on a tripod so not much changed between them.
I placed one on top of the other and used auto align layers and then used a mask on the top layer.
I did have some retouching to do afterwards as there were parts that just didnt show through properly but for the most part it wasnt too bad.
I applied a curve to warm up the blacks (just add magenta and yellow to the shadows) and applied a couple vignettes to darken up the edges.

Thursday, December 02, 2010

hi contrast card

Photobucket
Thanks first off to these models for permission to post this image to my blog.
I was happy with the shot and wanted to make sure i got the notes down so i would remember how i did it, as well of course as sharing the information so others could do it too.
I set up 4 lights. The main, which was high and ust to the right a bit, was a large softbox shooting straight accross the ceiling. I had a light on the left and right which were reflected into umbrellas. I also had a light high up and directly behind the group which was aimed direct at them with a 40 degree grid spot. The power packs were all set to full power and the lowest setting they could go.
In lightroom i put the recovery, fill light, contrast, and clarity at 100%. My blacks were at 70% and saturation was -38%.
In photoshop i sharpened about 37% and added a vignette (twice actually) to burn the edges down. I also applied a curve to increase the blacks and lighten the highlights (just moved the top and bottom of the curve in a bit).
This was just a fooling around shot at the end of the shoot by the way. Otherwise i probably would have removed the last pair of socks.

Tuesday, November 30, 2010

collage project

Photobucket
No explanation November is almost over so its now time for descriptive December.
I have decided to start collecting images for a collage project. I have no idea what it will look like in the end and really only have this one image so far. I guess anything can happen now. I will post images as i collect them. I will also try to get lots of images up early in the month as i plan to try and stay off the computer over the christmas break.
I upped the clarity in this photo and wanted even more so in lightroom i also painted over the entire image with the adjustment brush which i had put the clarity at +100. I also lowered the saturation and did nothing else.

Sunday, November 21, 2010

Tuesday, November 16, 2010

Thursday, November 11, 2010

Thursday, November 04, 2010

Wednesday, November 03, 2010

Monday, November 01, 2010

Friday, October 29, 2010

karate action

Photobucket
This is a little different image for me today.
I shot this against the dojo wall but it included some of the ceiling as well. I wasn't happy with the background to say the least but liked the lighting and action, post looked cool too (upped the clarity and ran it though photomatix).
All i did to darken the background down was to create a new layer and then ran the vignette three times on it set to max. I then created a mask and dodged it out a bit.
I am still not happy with the background and will perhaps try the image again, not sure.
I am excited and very much looking forward to a big shoot i have tomorrow so i may just have to move on.

Wednesday, October 27, 2010

colors

Photobucket
Tonight i am trying to finish up a job i shot a couple weeks ago and have been doing alot of hdr on the photos since then.
I really enjoyed the shoot and am enjoying the photos even more, thanks "A".
This is a crop of a chair image that was in someones yard downtown. I ran the single image through photomatix and then sharpened heavily. I also added +33 to the saturation to get the color to how it felt to me when i shot it.
I have alot of images to prepare and once my clients website is live i will direct you there to view the rest.

Sunday, October 24, 2010

football action

Photobucket
This is a shot i took at my sons football game today.
I thought the image was a little quirky with the ref, guy in the air, ball half in, etc.
Thus it had to be posted.
When i shoot sports by the way i like to be lazy. By lazy i mean that i turn my brain off and use aperture priority on my camera. This of course is not being lazy i know. The light seems to change so much that you could miss a great shot. The clouds blocking the sun just as your scene is unfolding would be one example. Aperture priority setting usually solves this and gets your exposure close enough. I also use the largest aperature on my lens (f2.8) to blur out the background.

Saturday, October 23, 2010

car hdr

Photobucket
I took a couple minutes today on a visit to my parents to shoot a quick hdr of my car.
I used a tripod of course and bracketed 9 exposures. I chose three of the exposures and exported from lightroom to photomatix pro. I then added a heavy vignette and spent some time on curves to get the look i wanted. I also sharpened about 100.
I created a mask on my vignette layer and painted through to the unvignette layer underneath in the areas that i wanted to show through bright, like around the car and a line up to the top of the image through the trees.
The left image is the normal exposure with nothing done to it.

Friday, October 22, 2010

swimming action

Photobucket
I shot some swimming action photos tonight and ended up being happy with a couple of them. Swimming is not the easiest sport to shoot i have found. First my camera and lenses were in my car for an hour or so before i went to the pool and as such were cold. The second i stepped on deck the lenses fogged and 15 minutes later were still fogged. I spent the next five minutes wiping them off with a lens cloth and was then able to shoot. I found out a few years ago that they do not like it when you bring in a couple off camera flashes, thus i was shooting in a fairly dark, wet area. My iso setting ended up being 2000 and my camera settings were f2.8 (70 - 200mm lens) and 1/400 sec. I ended up using aperature priority mode as the light fell off about two stops as they got closer to the edge of the pool. It worked out pretty good shooting horizontally but was a bit dark when i switched to vertical. The next tricky part was the focus. I used continuous focus tracking and continuous high motor drive. The camera however liked to focus on the water being splashed up in front of the swimmer. I think if i were shooting this sport for a living i would play with my cameras fine tune focus to tweak it just a bit further back. The only other problem i encountered was a huge splash on a swimmers turn that covered me, camera, and lens.
I shot 4gb worth and ended up with a few keepers and wet jeans from the knees down. Just another day at the office.
I played a bit in photoshop too by the way. I bumped up the clarity, sharpened, and lowered the saturation for a more muted look.

Friday, October 08, 2010

yet another gull

Photobucket
Another seagull. I know.
I have so much real work to do but yet it is 11:30 at night and i am sitting alone in the dark masking out this seagull that i shot today during my daughters soccer game. Crazy i know.
Its times like this that we often ask ourselves why we do the things we do. The answer for me is enjoyment and the satisfaction of creating an image that i am happy with. Everyone would have their own reasons of course but i think the one thing that photographers would share is the need to create images. Its like an addiction but worse, its part of who we are. Be it photos of seagulls, people, landscapes, or whatever. The subject itself does not really matter.
For this photo i made a duplicate layer and bumped the contrast way up with a curve and then changed the layers mode to multiply. This gave me a pretty funky sky but made the gull pretty well black. I masked out the gull from this contrast layer so it kept its detail in the underlying layer. I sharpened the photo and thats about it. The masking took awhile but i thought in the end it was worth the time.
Looking at the photo now i realize that i should have darkened the bottom right corner some more so your eye would stop there and bounce back into the image. Some sleep right now is more important however.

Tuesday, October 05, 2010

back to hdr

Photobucket
The sky last night was amazing. This photo does not do it justice unfortunately.
I walked out of a building beside this one after a shoot and i was tired. Actually tired may not be a strong enough word, you get the point. I got in my car and i drove 20 feet. There i sat and debated if i was going to go into the trunk, dig out the camera, set up a tripod, and do an hdr of this scene before me. It was a toss up, did i mention that i was tired, but in the end the sky won.
I set up a tripod and put a wide angle lens on the camera. I shot 9 bracketed shots, several times, and then hopped back in the car and came home.
I planned to wait and photoshop the image when my brain was functioning but again the scene won out and i had to download and process right away. I ran 5 images through photomatix pro and then opened it in photoshop. The building was distorted like crazy from shooting it at a low angle with a wide angle lens. I worked on a curve first just to see if i could make the image look good and then moved on to transform skew. This worked for the building but the lamp post on the right hand side looked like the leaning tower of pisa, but worse. I made a loose selection around the lamp post and then hit copy and pasted it to a new blank layer. I then hid the layer and retouched the post out of the background layer (selected it and filled using content aware). I turned the new layer back on and rotated it until the post was straight. I retouched in some problems with the grass in the center of the image, added some yellow to the lamps, and did a vignette. Sharpened the image and i was done.
I was still tired in the end but was glad i stopped the car.

Monday, October 04, 2010

night wedding

Photobucket
I shot a wedding this past weekend that started at 6:30pm.
Thus when the wedding was over the days light was also almost over. I really, and i mean really, did not want to shoot group photos in a hotel ballroom against a blank wall so i quickly set up two sb nikon flashes and went to work setting up groups. It is amazing how fast you can get them done when it is really cold outside and it is getting darker by the second. It was so dark in fact when i shot this one that my camera was having a really hard time finding the focus.
The ground and trees in the background were black so i had to lay on the ground, in my freshly dry cleaned pants, and use what little light was left in the sky to break up the black. The shutter speed on this one was 1/3 sec, f3.5, and iso 500. I used a 35mm lens so i could get closer to the group and shoot up at a steeper angle. Of course the camera was hand held.
If it wasn't so dark and cold i would have adjusted this group a bit. I would have preferred some of the people in the back to be a bit higher but i really had to compromise on this one.
The wedding was great, i was happy with the photos, and i slept very well when i eventually got home.

Monday, September 27, 2010

no idea

Photobucket
I have no idea why i take photos of seagulls.
Even more so, i dont know why i post them on this blog.
Oh well.

Monday, September 20, 2010

street buskers

Photobucket
This is a shot of some street buskers that we watched during the harvest jazz and blues festival which was this past weekend. I played around with longer shutter speeds on some of the shots to create patterns with the fire. I should be able to post a few more this week.

Sunday, September 12, 2010

photo effect

Photobucket
This is a filter that i recently found called pixel bender.
I am going to bed so i will explain it and give a link in my next post.

Thursday, September 09, 2010

seagull portrait

Photobucket
I took this shot recently in bathurst new brunswick in between soccer games.
I am not much of a wildlife photographer but what i liked about this shot was the background and the color tones in the shot.
Since this one i have seen a coyote, in my subdivision, a moose, and deer. No other photos however.

Sunday, September 05, 2010

business portrait

Photobucket
I was asked to shoot a portrait at work and there was only one problem, it was mid august and my brain was on vacation. The only thing going for me was that the guy i had to shoot looked good no matter what i did. I shot in various locations throughout the building that he works and then we walked across the street to the location seen in this photo.
For me, photographically, this location was by far the best for background. When looking at this shot you first just see his face, but when you look past to the background there is alot going on. There were some distracting reflections of light in some of the windows which i had to retouch out and i did some work on my subject with the healing tool and the liquify filter.
I used one sb flash bounced into an umbrella and placed to the right side. I balanced it with the ambient for the background.
For starting off slow i ended up being very happy with the shoot.
I will be talking about vision, and lack of, in the near future.

Wednesday, September 01, 2010

different angle

Photobucket
While shooting my sons baseball game i decided to photograph the rest of his team also so that i could send them some action shots to remember their season. I had fun and played around alot, with different lenses and angles. I laid along the third base line for a few, the same for first base, and took lots from behind the mound. This was just one of the shots that worked out pretty good.

Monday, August 30, 2010

cs5 panorama

Photobucket
I was asked to shoot a new casino in moncton, nb over the weekend. I knew that it may be a bit difficult as the building is extremely long and not very high.
I knew i would be doing some panos and over the course of the day i did a bunch. I shot over 700 images, which i though was way too much, but i also did some hdr shots which ate up the memory quickly.
I opened the photos in lightroom and sent them to edit in - photomerge.
I really just added a curve for color and that was about it.

Monday, July 12, 2010

subtle changes

Photobucket
There will be two images to this post. They both were taken approximately one minute apart, used only natural light, and the spider did not move. The only thing that i changed was the exposure and my camera angle.
For the top image i exposed for the sky and let the spider go to black. I started by only having sky behind it and then included the trees at the bottom and left. For the image below i exposed for the spider and raised my camera up so that i got no sky and only trees in the background.
It was getting dark so i had to use an iso of 1250 and a fairly slow shutter speed. In photoshop i did a fairly heavy curve to each image. Mainly increasing the highlights and darkening the three quarter tones. I also added saturation to the top image to bring out the blue of the sky a bit more. In the original photo the sky was more of a baby blue and was really blah. I sharpened the photos quite a bit, amount of 50 to the bottom one and 100 to the top.
I have taken a pile of photos lately which i really like and i am truly surprised that i am posting two shots of spiders that i shot out my bathroom window about an hour ago. I had planned on posting an image i took this morning which used 4 strobes, two hidden in the scene, and which i did alot of photoshop work on. Guess that will have to wait.
Photobucket

Tuesday, July 06, 2010

masking black and white

Photobucket
My neighbor is always fixing or building something so i thought i would take some shots of his most recent project, making one good lawn tractor out of two. As i may have mentioned a couple posts ago, i am trying to change up the way i shoot a bit. This image may not reflect that but i shot alot and did have some progress on some of the other images.
In photoshop i opened an image that i had converted to black and white in lightroom. I then went back to lightroom and converted it back to color and opened that one too. In photoshop drag the black and white image onto the color image while holding down the shift key (this will center it). Since they are the exact same photo they are already aligned and the only thing left to do is to create a layer mask on the top (black and white) layer. I painted over the lawn tractor with a brush set to a low opacity, mabey 20% and just built it up until i had the amount of color i wanted showing through.

Friday, July 02, 2010

blending multiple frames

Photobucket
As i mentioned yesterday, i set my camera on high speed drive and these are the four frames i got. I didn't really plan for this but it all worked out quite nicely.
I opened all four images in photoshop and then selected all the layers together. I went to the edit menu and hit align layers. I then used layer masks on the layers to show through the guy doing the trick in his different positions. It is a little friggy figuring out what layers to apply the mask to first and to help me i turned the visibility off on the other two layers that i was not using at the time. That meant i had two layers visible and i could lower the opacity on the top one so i could see where to apply my mask. Sorry to be confusing on this one.

Thursday, July 01, 2010

happy canada day

Photobucket
I had some fun today and shot a ton of photos.
It started with a basketball game in the driveway, on to a slippy slide on the lawn, and then off for a walk downtown to take in some canada day events. Oh, and photographed my friend and son taking apart two ride on lawn mowers.
So as i mentioned i have a ton of photos ready to post. I will be adding daily for the next little while.
I really enjoyed last months black and white theme and thought i would continue it for awhile. I will let the images decide.
The shot above is from our walk downtown today. I saw this kid do an amazing jump on his skateboard in front of his friends. I did the stop, watch, and walk away, when i noticed that he was heading up for another run. I rushed back and told him to hang on a sec. I did a test shot for exposure, set the focus, and put it on continous high speed motor drive. This was the first image of the series and it ended perfectly with him landing the jump on his board. He went through the faces of his friends however and i do wish that i had gotten as low as possible. Would have been neat to have him over their heads.
Part of my reasoning for shooting lots today is that i am trying to change my style a bit. This photo is not much of a change but it may take awhile. I want to add more movement and candidness in to my shots. We will see what happens.
In photoshop i put a much darker layer of the image on top of the original exposure and then masked out the people in the shot. I wanted everything in the image darker than it was except the people. I also put a bit of a vignette on it.
Happy Canada Day to you all.

Monday, June 14, 2010

trampoline shots

Photobucket
I like to fool around with mid air trampoline shots and tonight was no exception.
For the shot on the left I set up a sb flash on a light stand that was raised as high as it would go. I set the ambient light where i wanted it (shutter speed) and then waited for the action.
The shot on the right was just ambient light and i did a psudo hdr using the camera raw settings in lightroom.
I will quit stalling from the real work i have to do tonight.
By the way, the shot on the right is a skateboard that has all the hardware removed and then a pair of sneakers duct taped to it.

Sunday, June 13, 2010

one light grad photo

Photobucket
I had a busy photography sunday today.
The image above is from a grad shoot with my niece. I really enjoy shooting these kind of images. I use one light and an umbrella (a small silver one because it wont blow over too easy) and walk around downtown and look for cool locations. I like the fact that i can play with my compositions and light and that i only have one person in front of the camera to worry about.
It was pretty much a stress free shoot compared to the one i did just before it where i had 60 people looking at me to make decent images.
Grads are also fun because i like to challenge myself to make them all look different. I may shoot in this particular alley alot, my favorite spot, but i always make it look different. My clients like this because they say i dont shoot "cookie cutter" grad photos. In defense of someone that shoots grads for a living, they dont have time to make them all unique. They have bookings every hour and need some kind of formula to make their business work.
I am all over the place here because i am watching zack arias live online giving a workshop at creative live.com, so i will finish this post up.
I shot this photo at f2.8 (to blur the background) at 100 iso and 1/250 sec (both of these settings were to darken down the ambient, which was cloudy). I used a 80 - 200 lens zoomed out to 80 but for the real shots i was zoomed closer to 200. Without the flash the image was not as good at all. I needed her lit and needed to over power the ambient just a bit.
I will post more of the photos as soon as i have a chance to play with them so you can see the real results.
Back to zack.

Friday, June 11, 2010

new look

Photobucket
Tonight i noticed some new templates on blogger and i was far overdue to change the look of this site.
Hope you all approve.
In keeping with my black and white month i have converted a very nice color photo. The sparks in color make this one but thats ok. I did not do much to this image in photoshop or lightroom but thought i would give you my camera settings in case you have the chance to recreate this one.
I used one off camera flash pointed directly at his face and set to the right of camera. This took care of him and i kept my shutter open to take care of the sparks. Remember to set your aperature for the flash exposure and the shutter speed for the ambient.
I used a 24mm lens and got in close, sparks were hitting me in the face and head but i did use glasses and a helmet. Shutter was at 1/20 sec hand held, f7.1, at iso 160. I have done shots like this before and just get the guy to weld a scrap piece of metal to something he is actually working on and then get him to grind on the angle you want the sparks to fly.

Monday, June 07, 2010

black and white

Photobucket
After my last post i decided to so some more black and white images. Mabey that will be my monthly theme for a change.
Black and white has always been my preference over color but for some reason i dont convert my images that often.
There are many ways to convert to black and white but here i just took the simple route and drug the saturation slider in lightroom to zero. I did do a curve in photoshop later to bring up the highlights and darken down the shadows and brought the clarity up a fair bit also. I added some bubbles from other photo as the original ones were pretty much just in a straight line. I just used the clone tool, as you can go from one image to another.
One thing i remembered after looking at the image i posted yesterday is that i left a bit of warmth in the photo, just added a curve is all. The one above has no color left at all.

Saturday, June 05, 2010

im back

Photobucket
I just checked the date on my last post and it was a month and a half ago. Far too long to let this site go untouched.
I have been reading a few really good books which has absorbed my time (vince flynn is the author of them by the way).
I have also been taking lots of photos and have some good ideas for learning posts here. For example i shot a portrait the other night using two off camera small flashes and i want to show the full series from first to last. The first was not good but it got better by the end. I will get those images ready soon and discuss my thought process.
The one above is just me looking in the mirror. I got a new, used, 35mm f2.0 lens and was trying it out.
I did all photo adjustments in lightroom. Mostly heavy clarity, plus clarity in the adjustment brush. I did open in photoshop and did a much darker version and then masked back in the lighter parts i wanted.
In lightroom i did also do a vignette, tone curve, and sharpened.
Thanks for staying with me during my absence. I had over 1000 hits last month, and thats with no posts. Going for a few more this month.
cheers

Friday, April 23, 2010

lightning storm

Photobucket
I haven't shot lightning in probably 20 years, until last night. It was quite a show and when i finally decided to grab my camera and take some shots it was almost over. I was watching the hockey game and was nice and comfy so to get up and go to the car for the tripod, dig out the camera and blow the dust off, set up and shoot, was hard. I was happy in the end that i did so all was good.
I used a 50mm lens as i did not know where the lightning would strike, camera set to iso 200, aperature of f11 to f16, and a shutter speed of 30sec. I just kept hitting the shutter button as soon as the 30sec was over and hoped for a strike while it was open. I cropped the images, sharpened and that was that.
Photobucket

Thursday, April 15, 2010

Decisions

Photobucket
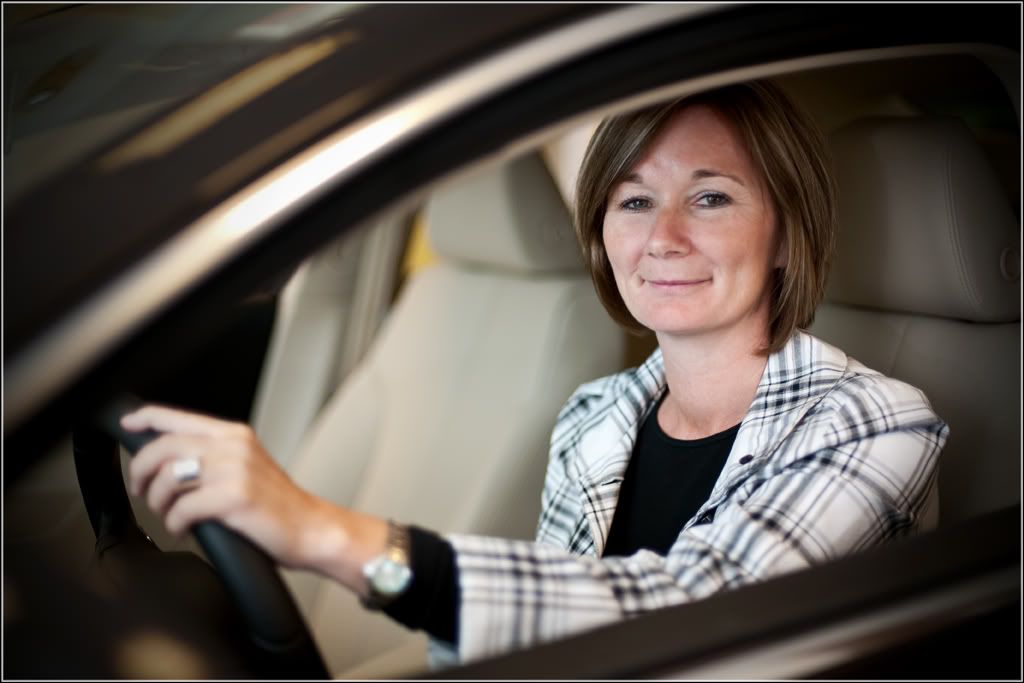
This is a photo of my wife i took over the noon hour today. The decision that i mentioned in the title was not whether i would take her photo or not but how i would take it. What would i use for a background, lens, fstop, light, etc, etc. Our experience as photographers is kind of like a large bag of tricks. What have i done in the past on shoots, images i have seen online or in magazines, successes as well as failures i have had, all fill up this bag and give me options when i get to a shoot that i can draw from. Its rarely easy to walk into a shoot and take an exceptional photo right off the bat. You can think of it like sports, you have to warm up first. On this shoot for example we started in my wifes office. I tried some shots just using window light and adjusting her pose so the light worked. It did not work. Not enough light in the eyes. Nice background, foreground, everything else, except the eyes. It was her suggestion to move to the car next. I rarely turn down a suggestion from my subject, especially if the shot is not working for me. If the shot is working i will spend some more time at it and finish up that location and then move to the new one.
New location, new set of decisions. I started with composition on this one, decided on fstop, then set up my light for the proper power to achieve the fstop i had chosen. In this case I had chosen f1.4 (50mm lens) so the flash was set to something like 1/16 or 1/8 power. I used a sb900 with the dome diffuser on it and shot it through a very large umbrella. I placed the light in front of the car so it would go through the cars windshield. I set my shutter speed to 1/200 sec which, by trial and error, gave me the ambient light level i wanted. A good rule of thumb is to get your ambient set first and then build up the flash. I took about 10 frames or so just to get a good content expression on her face and then let her out of the car.
In photoshop i did a bit of retouching to her face and did a curve adjustment. I duplicated my background layer and used lens correction to add a vignette. I then created a layer mask and painted in black over the face so the vignette would just be where i wanted it. I ended up doing this twice as it was not dark enough the first time. I flattened and duplicated the background layer again and desaturated it. I then adjusted the white and black points to make a very contrasty image. I changed the layers blend mode to overlay and lowered the opacity to about 20. I sharpened and was done.
So, would i do the exact same thing on my next shoot. No, probably not. I dont know what trick i will pull out of the bag for the next one. I just hope that it is a good one and i will be as happy with the next shot as i was with this one.

Monday, April 12, 2010

interior in hdr

Photobucket
I shoot one building every year or so for a company that makes steel. I have shot a water treatment plant, a high school, an overpass, and now a gym. I am sure there were a couple more in there but i cant remember what they were now. I started using hdr awhile back because the interiors were very dark and you could always see to the outside, which was very bright. Before hdr i used different exposures and composited them together in photoshop. Hdr has saved me hours and hours.
In between my sons volleyball games saturday morning i took a quick run over and bracketed about 240 frames. I spent a good part of my sunday evening running them through lightroom and into photomatix. I used a mid light smoothing setting in photomatix and cranked up the luminosity slider to the far right to light up the ceiling. I used 5 bracketed images for this one which was shot with a 24mm lens, on a tripod, at 200asa. I was very cold and was worried about camera movement on the slower exposures but everything worked out ok.
I opened the tonemapped file in photoshop and did a curve, a sharpen and that was that.
I am very much looking forward to when the building is completed. I have two shots planned, one inside and one out, and they will both be hdr. I just need a helicopter for the outside shot but other than that it should be pretty straight forward.

Saturday, April 10, 2010

interesting people

Photobucket
When shooting an event i always try to take my focus off what everyone is looking at so that i can look at them. I found this very interesting looking man who was also shooting the event and i had to take a few photos of him.
The sky was overcast which made it perfect lighting conditions for every angle. I tried to be a little bit sly while taking this photo as i did not want to attract his attention. I dont think he would have minded being my subject but i did not want him looking at the camera. I wanted him natural and relaxed and focused on what he was looking at. He did catch me later taking another frame and my shot has one of his eyes behind his camera and one looking straight at me.
I think my aperature was around f4 and i wish i would have shot it at 2.8. Most of the shots i was taking of the event needed a bit more depth of field but he certainly did not.
I did most of the work in lightroom. I added 4 graduated filters to darken down the sides and top and bottom just a bit and then opened in photoshop to crop and sharpen.

Friday, April 02, 2010

more flower photography

Photobucket
My wife unexpectedly had her gallbladder removed a couple days ago and as a result we have had a few bunches of flowers delivered to the house. This bunch was sitting on the counter and the light was nice. The background was crap though so i went to the garage and found the black cover for my cars hatchback. I rested it against my tripod and was ready to roll.
I shot the photo at f1.4 with my 50mm lens hand held and only used the natural light.
I prepared the photo in lightroom but once opened in photoshop i realized that i did a horrible job of the contrast and color correction so i applied a curve. I sharpened the photo and that was about it.
Creating an image is a process. Could be trial and error, usually lots of error, or preconception. For example the photo above falls under the latter. I had made all my decisions before i had taken the shot. I knew the background, composition, angle, depth of field, lens, etc. It is certainly not always like that but i prefer it when it is. I like to see an image in my head and then make it happen. Sometimes however i can be surprised with what i end up with when i go the trial and error route and get something totally unexpected.

Sunday, March 28, 2010

flower photography

Photobucket
Sometimes, very often that is, I am in the mood to shoot a few photos. I typically dont want to make a big production out of it and turn it into work, so I shoot things that are close at hand. My, perhaps soon to be, brother in law brought my daughter and wife some flowers last week and they were very nice and colorful, and of course close at hand.
I put a close up lens on the camera and set the vase of flowers kind of close to a large window we have in the back of the house. It was nice, soft, indirect light. I was in manual focus so i grabbed a tripod and since i was all locked down, decided to shoot some hdr. I bracketed over a 7 stop range and did this for a few different compositions. I used iso 200, an fstop of around f16 and my normally exposed frame was at 1/8sec. I chose three exposures and ran them through photomatix.
When the tone mapping and processing was complete i opened the image in photoshop. In no particular order I; retouched a bit, sharpened, applied a vignette, burned down the midtones on the center stem, created a curve adjustment layer, and used apply image to bring back some detail in the reds. I have talked about this apply image technique in detail in some previous posts and highly recommend using it when there are reds in your photo.

Friday, March 19, 2010

nice light

Photobucket
I walked by this art studio, which is across from my office, this afternoon and noticed that the light was very nice. Very soft and airy with very muted color tones. My key just happens to work in that door so i accosted my good friend and brought him into the light. The photo on the left is what i had intended to shoot but i had walked in first and he stopped at the door which gave me the unexpected photo on the right.
I used natural light and played a bit in lightroom and photoshop.
I have been in the mood to do some portraits lately but just need some time and subjects.

Thursday, March 18, 2010

larger image solved

Photobucket
It was photobucket that was resizing my images afterall. I must say though that for a free image hosting service they are amazing. I sent them a note to see why the images were resizing and within 5 minutes they had replied and told me what to do. It is in the upload options and you have to select the size you want your images. The largest size is 1024x768.

bridge in hdr

Photobucket
My main reason for doing this post was to see if i could get my images to show larger on this blog page.
It did not work unfortunately so i have some more playing to do.
I took this photo last weekend under a local bridge. I used a tripod and bracketed over a 7 stop range. I chose three photos and blended them in photomatix pro to get this result. Without using hdr techniques the bottom of the bridge would have been in shadow and featureless.
I am going to try very very hard to have more of these little photo shoots. I am challenging myself to see a bit differently lately.
As a photographer i realize that i am constantly evolving, learning, changing, maturing, etc. This has always been a conscious effort and battle but one that i have enjoyed.
Becoming a photographer is a great journey that i hope everyone reading this blog is on.