Friday, October 31, 2008

planets

Photobucket
I was at a trade show a couple days ago and got a chance to meet and talk to a very good pano photographer. I have his web site address at work and will post it soon. He taught me how to do the planet panos that i have seen popping up on some flickr sites and i wanted to give it a try. Above is my first attempt and i have some work to do for sure.
I will not go into detail on the process as i have a link to it which explains very well what to do.
Just in case the site goes down however here is the short version.
Shoot a 360 degree pano and stitch it together using photomerge or whatever software you favor. The horizon has to be level.
Go to image size and make the photo a square (do not constrain the proportions). The photo will now look really bad but thats ok. Rotate the image 180 degrees and then go to filter - distort - polar coordinates.
You will probably then have some retouching to do but that is about it.
Check out this site for more detailed instructions
http://www.dirkpaessler.com/blog/index.php/photographers-tools/2006/09/06/tutorial-create-your-own-planets/

Monday, October 27, 2008

cape enrage

Photobucket
This image was shot with an 85mm lens as that was the longest lens i carried on this day.
I wanted a bit of drama in the shot which is why i included the foreground rocks. In photoshop i boosted the contrast a fair bit to make the blacks black. I duplicated the background layer and did a strong curves adjustment just to enhance the sky. I then created a mask and painted over the land in the top layer so the dramatic sky would show through and the normal forground. I selected the whole image and went to select - modify - border and entered 2 pixels. I then filled that selection with black. I then deselected and went under edit - canvas size and extended the canvas to allow for some printing under the image. I placed a grid line, by dragging it out from the ruler on the side, and placed it at the halfway point. I then selected the text tool and using the centered option i clicked on the gird line. I then typed my name and then selected the text and color i wanted.

Wednesday, October 22, 2008

dramatic photomatix

Photobucket
Here is another shot from my weekend away. I tried a bunch of different things and have tons of images to play with now, just no time. For this shot i used a 14mm lens handheld and bracketed 7 frames. I ran the proper exposure along with the lightest and darkest exposures through photomatix and cranked up the strength. I applied a curve once i had the image in photoshop and sharpened the image. I also did a vignette on this one, but not on the image below.
The image below is the normal exposure converted to black and white, sharpened and a curve to boost the contrast.
Photobucket
When doing a comparison here not only look at the sky but also at the seaweed to the right that in the original gets blocked up.

Monday, October 20, 2008

photographers

Photobucket
Like i said in my last post, things went down hill fast, kidding.
While still inside the covered bridge we set the camera on a tripod with a 14mm lens on it, thanks murray. I then took photos while gordo jumped at the camera. We then switched roles and it was my turn to jump. I had two flashes set up, one to each side and at about a 45 degree angle to where we would end up.
I opened the photos in photoshop and placed one on top of the other so i had two layers. I highlighted both layera and did an auto align layers. I then just created a mask and drew a very rough selection around about half the image with the lasso tool, refined edge to feather it a bit, and then filled that part of the mask with black. We were now both showing through.

Sunday, October 19, 2008

covered bridge

Photobucket
I did some shooting today with a good friend of mine at some different locations along the coast.
We of course started the day shooting some landscapes but as what typically happens when two photographers get together, the serious shooting quickly ended and the crazy ideas came out. We shot alot of really goofy stuff and then packed up and headed for home. We saw this covered bridge on the way back and decided to stop and have have a little strobist shoot. Strobist for those of you that dont know is all about off camera flash. Here i used one flash to camera right and drug the shutter to 1/8 sec to bring up the sun coming through the slats in the boards. That is the sun at top right, not the flash.
In photoshop i desatruated and sharpened and applied a circular gradient inside his flashes head to make it look like it was going off.
There will be several more shots from this shoot posted and you will see just how silly things got.

Saturday, October 18, 2008

halloweeen is coming

Photobucket
I didn't shoot this for any reason really. I was actually just trying out a lens i just got (85 f1.8) and the cat happened to yawn.
I did do the raw funky sliders thing to it and then just duplicated my background layer, went to filter-distort-lens correction and laid down a heavy vignette. Then just added a layer mask and painted in black to take the darkening from the vignette off the cats face. I sharpened, cropped (deciding the composition was the hardest) and was done.

Wednesday, October 15, 2008

4000asa hockey

Photobucket
I haven't posted in at least a week and it feels like forever. I hit another busy stretch but that should level out soon enough.
I just wanted to throw up a quick image of hockey action. I shot this with the nikon d700 at 4000asa. The speed was needed as i was shooting through the glass (dirty) which takes away about one stop.
I shot the image in raw, uncompressed, and at 14 bit.
You can see lots of grain in the high res image but it holds up pretty good, especially compared to the d2x which would have added huge gobs of color noise.
The only thing i did in photoshop was a quick curve to lessen the cyan cast in the whites and i used the sharpen tool on all the logos on his jersey. The rule is to use the sharpen tool on any text or shiny things, like jewelery.

Sunday, October 05, 2008

photographer portrait

Photobucket
I was set up early for a portrait i had to do last week and my friend and fellow photographer graciously offered to sit in so i could check my light. Really easy light actually, one off camera flash shot through an umbrella. I mainly just needed to balance it with the ambient light that was hitting the background.
All i really needed to do in photoshop was to darken down the white trim in and around the windows behind him. I also retouched a bit, added a fairly heavy vignette and sharpened. I did a slight curve also but i usually always do.
A little note to a curve. To warm up an image a bit but not produce a noticable color case you can just slide the shadow point for green a bit left to add magenta and the shadow point for blue a bit left to add some yellow. This will just tint your blacks a bit and as a result warm your image up.
Below is a black and white that i played with in camera raw.
I much prefer the color version but added the other just for fun.
Photobucket

Saturday, October 04, 2008

photomatix landscape

Photobucket
We picked out our halloween pumpkins today and I just so happened to have my camera in the car.
I shot seven shots bracketed by a stop each hand held.
I ran the normal exposure, darkest and lightest through photomatix.
I set the strength to the max and once again just played with the sliders until it looked right. The pumpkins however never looked right.
I opened the image in photoshop and placed the normal exposure image on top of the photomatix image. I placed a layer mask on this normal top layer and painted over the sky and trees with black so the photomatix layer underneath showed through. I then lowered the opacity of this top layer to about 40 percent to blend it in with the photomatix pumpkins.
I sharpened the imgage and then used the dodge tool set to highlights and used it on the orange sign to make the light look a bit more mottled. I lowered the saturation of the image by a bit also.
The normal exposure image is below.
Photobucket

Thursday, October 02, 2008

photomatix

Photobucket
I showed up early the other day for a shoot and ended up with a half an hour with nothing to do.
Might as well take a few photos i figured.
I set the camera on a tripod and bracketed my exposure over a 7 stop range. I wanted to see what photomatix would give me as i have not had much luck with it lately.
I ran all 7 images through photomatix and played with the setting quite a bit until i got the look i wanted.
I turned the strength all the way up and lowered the color saturation a fair bit. My other sliders ended up being quite far the the right side of the screen also (sorry as i did not mark down what they were). Once i was done with photomatix i saved the image as a tiff and opened it up in photoshop.
I did a bit of retouching and then duplicated my background layer. I applied a fairly heavy vignette in filter - distort - lens correction and then applied a layer mask and painted in the areas that i wanted to keep light (background). I then used the dodge tool set to highlights and a strength of about 8 to paint over the right side of the building a bit, was pretty dark. I hit the tree a bit also with it and some areas of the building. I then used the burn tool set to midtones and a strength of about 8 and darkened up the left side and middle of the building. I used this on the tree a bit also.
I then smart sharpened and did a curve to adjust the colors and was done.
I put the original photo below.
Photobucket

Tuesday, September 30, 2008

high contrast in camera raw

Photobucket
I shot this image tonight for a passport photo.
I thought i would have some fun and was pretty happy with the result.
I used one light bounced into an umbrella that was placed in front of her and aimed straight at her. It was about 6 feet high.
I opened the image in camera raw and used these settings:
temperature 5150, tint -10, exposure +.05, recovery 100, fill light 70, blacks 67, brightness +41, contrast +100, clarity 100, vibrance +100, saturation -88.
After all that i hit open.
I duplicated the background layer and went to filter - other - high pass. Set the amount to 6.4 and hit ok. Change the blend mode in the layers pallate to overlay and then lower the opacity to 66%. Flatten the layers.
Then i smart sharpened at an amount of 50%.
Next duplicate your background layer. Highlight the background layer (bottom layer) and fill with black (edit - fill). Now highlight the top layer (background copy) and in the layers pallate add a layer mask. Fill the mask with black. You will now see a black canvas. Change your forground color to white, select your paint brush in the tool tray and use a fairly small brush. Then make the small brush strokes such as you can see in my image above. Then use a larger brush and paint in white in the mask over your subject so no black strips can be seen on them.
Flatten and do a curve adjustment to up the contrast a bit more and save.
Sorry for rushing through this technique but if you try it you will see that it is very easy.

Thursday, September 25, 2008

neg strip again

Photobucket
I was just playing with the neg strip again and thought i would post it.
Still not sure if i have found where i am going with it.
I just opened one image file and dragged my neg strip onto it (see earlier post for strip details).
I duplicated this layer and erased the numbers then created new ones with the text tool.
I used the blur tool on them a bit too just to make it look like they belonged.

Wednesday, September 24, 2008

image restoration

Photobucket
Anyone that has a copy of photoshop loaded on their computer has received this request before, "is there anything you can do with this, it is the only photo in existance of this family". This last request came from my dad so of course i was going to take a stab at it. I also love doing restoration on old black and white images. Color not so much but black and white, bring it on.
I started this image by duplicating the background layer. I then used this new top layer for all my corrections.
First i desaturated the layer and then using the healing tool i retouched all the cracks and marks out. Just takes time and patience is all, really not that hard. When the healing tool messes up just switch to the clone stamp tool. I used the clone tool for all the edge work around the outside of the photo.
I then added a curve adjustment layer and brought the shadows up quite a bit. I also added a bit of yellow and magenta just to give it a little bit of warmth.
I used the burn tool set to shadows to darken up the kids legs a bit as they were weak.
I used the measure tool to straighten the photo and then cloned in the left edge to extend the background.
I cropped it and was done.
I also tried to reduce the pattern in the photo but had no luck.
Below is the finished photo.
Photobucket

Tuesday, September 23, 2008

white on white

Photobucket
I did a shoot recently of two pharmacists, seperately. The client wanted the shots on a white background for an ad in a newspaper and the subjects would be wearing a white lab coat, cringe.
I decided to try and make the background a bit whiter than the lab coat so i could clean it up and at least have an edge to work with on the coats. I used one light (shoot thru umbrella) on the subjects, and one flash pointed at a 45 to the background to make the area behind their heads white. I was in a very small office so the wall to the right of the subject provided fill.
The people were great, shots looked fine, and the individual shots were easy to clean up.
I thought i would see how difficult it was to strip them together and that proved a bit more challenging but not too much.
I extended the left of the canvas on the ladys photo and drug the man s shot in. I created a mask on the top layer (man) and filled it with black to hide all, i needed to see the ladys arm as i wanted it in the front. I then made a rough selection of what i wanted of the man to show and filled it with white. I chose my paint brush and painted in the rest of him (close to the lady).
By the way, i used the dodge tool set to highlights with an opacity of about 15 to make the backgrounds white in the single photos.
I also had the ladys head pointed down a bit which resulted in her neck buckling. I used the liquify filter to tuck it up into place.

Monday, September 22, 2008

film strip

Photobucket
I have been wanting to create a film strip digitally and place photos into it for awhile but just never got around to creating the neg image. I scanned a strip of 2 1/4 black and white film today on an epson flatbed scanner. I placed white paper behind it and just did a reflective scan. I cleaned it up in photoshop (dust and marks retouched) and upped the contrast with a curve till i got just black and white, no greys.
I used my magic wand and selected the black edge of the film (i had picked a neg strip where the image inside was white against the black film edge). I held the shift key and added the white text and numbers to my selection. I then inversed my selection so the only thing selected was the inside of the three images. I saved my selection, select - save selection and labeled it "edge", then saved my image to my desktop.
I then opened a new window and made it the exact same size as my film strip image, with a transparent background.
I did a full selection of my film strip image and while holding the shift key down i dragged it onto this new file.
I then went under select - load selection and navigated to my saved image, under channel i chose "edge" which i had saved before.
Now, with the inside of the three images selected on my top layer i hit the delete key, which showed through to my transparent layer underneath. Then deselect.
I then opened my three images that i wanted to place in the holes of my film strip and sized them to fit. I dragged them over and placed them in between my two existing layers. This let them go under the film strip edge. I moved them into place, sharpened them individually, and flattened my file so i could save as a jpeg.
I also scanned a 36 exposure roll of slide film that i have an idea of how to play with.
That will be coming soon.

Friday, September 19, 2008

lucis art again

Photobucket
Its been some time since my last lucis art post.
I was testing out my cameras auto face detect focus on continuous low drive tonight as my daughter ran along the sidewalk.
It did an alright job but i think i had it set wrong. I kept the camera pretty steady and held my shutter button down.
I opened up the six or so photos and then placed them all into one image so i had the six seperate photos as six layers.
I highlighted all the layers and used edit - auto align layers. I then created a mask on the layers so that only she showed through to the background beneath. I flattened the image when the masking was done and desaturated it.
Just so she would like the shot even more i ran it through the lucis art plug in and set the strength to about 75.

square format

Photobucket
The sun was going down last night and the neighborhood was alive with kids on skateboards. I put a 50mm lens on and ran out into the street with the motor drive on high (kidding, but close).
I tried converting to black and white by taking the saturation slider all the way down in camera raw and then did a curve on the open file to boost up the contrast, blacks mainly as they were weak.
I then tried a crop to square (i used to use a hasselblad in the old days and love the square format) and applied a 15 pixel black stroke (select all, then edit - stroke).

Thursday, September 18, 2008

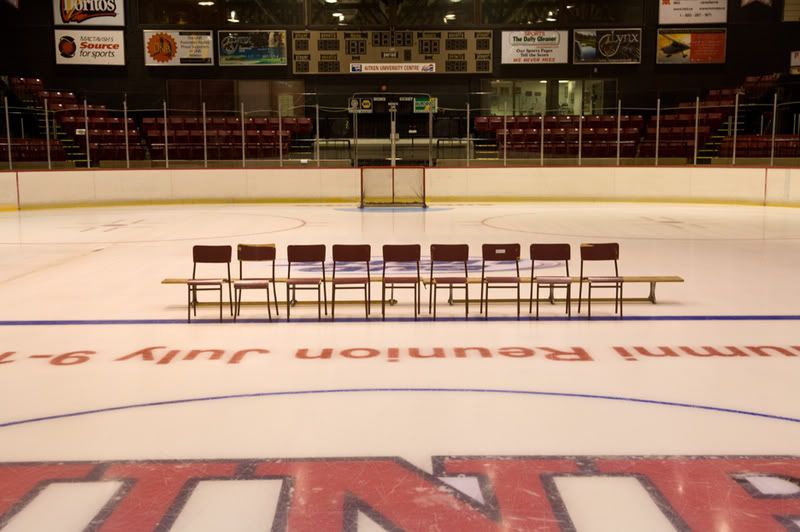
team photo

Photobucket
A team photo, but wheres the team???
Just a note before i get started, this could be a long complicated post, you may want to click the back button.
I have done this hockey team photo as long as i can remember. Each year, with digital and photoshop, i change the way i do it just enough to keep it interesting for me. While standing on a chair at center ice waiting to fall i decided to photograph the background scene with no bodies in the shot and no strobes turned on (available light).
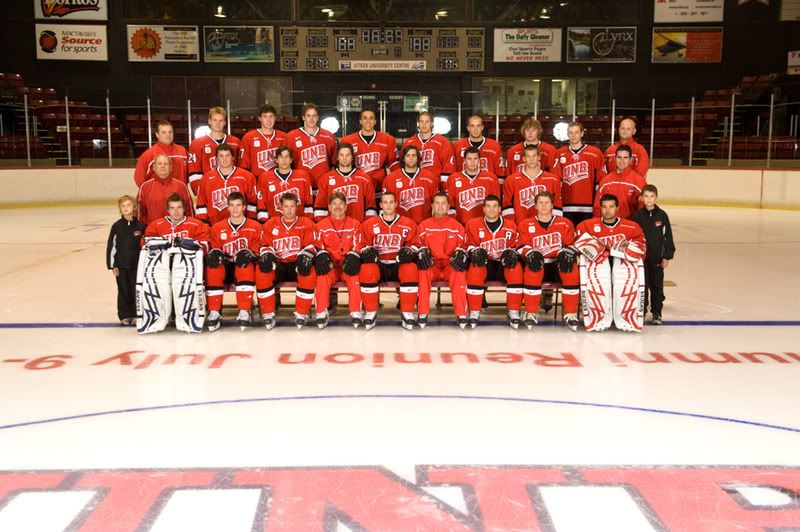
I always have a problem with my strobes showing up in the glass behind them (see next photo) and i have to carefully retouch them out which is a pain. Not this year.
Photobucket
This is the team shot with two strobes bounced into umbrellas, basic copy light really. You can see what it does to the glass behind their heads.
I started by opening the above two photos in camera raw and adjusting the colors and white balance until they looked similar.
I opened the files in photoshop and then placed the team shot on top of the chairs shot by using the move tool and holding the shift key down and dragging it over. I then highlighted both layers and went under edit - auto align layers. I was hand holding the camera and the auto align function works great almost every time. I then added a layer mask to the top layer (team) and using the paint brush painted in black over the background glass (over everything from the top of the boards up). this allowed the underlying layer to show through, hard part was going around their heads but it worked in the end.
After this was done i retouched all the lines and text off the front part of the ice using the clone tool.
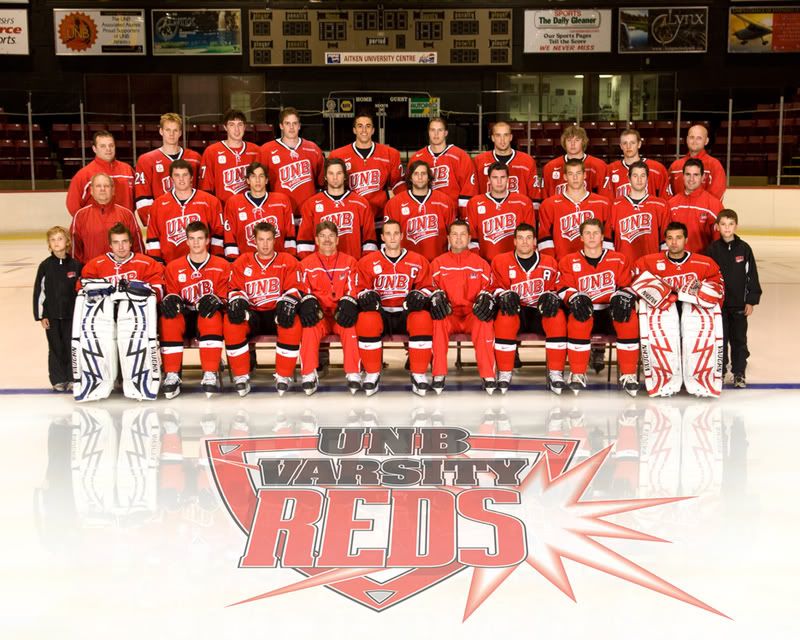
If you look closely at the photo above you will notice a player missing on the right side. He was absent so we left a space for him in the exact same spot he stood last year. I did a rough selection on him from the last years photo with the lasso tool and drug him onto the new team. I used the edit - transform - scale function to size him up a bit as i must have been zoomed out more last year. Note to hold down the shift key when you do this as to constrain the proportions.
I then applied a layer mask to his layer and painted in black over everything i didn't want to show (since i did a rough selection). It turned out that his shirt did not come down far enough as there was a head in front of him last year so i had to make a selection of one of the other players jersey (lower part) and drag that over and blend it in to fill the gap.
Once he looked good i flattened the file (saved it first of course) and duplicated my background layer. I went under edit - transform - flip vertical and moved the layer down to place it where a reflection would be on the ice. I had to rotate it a bit (edit - transform - rotate) to line it up and then i added yet another layer mask to this layer. I painted over everything above their feet with black on the mask and then went around the bottom edges with a lower opacity on the brush (just to fade the reflection into the ice).
I then drug the logo over from last years photo ( i just squed it and lowered the opacity last year).
I flattened the file and sharpened and cropped and, whew, was done.
All this only took 4 hours.
Below is the final result.
Photobucket

Monday, September 15, 2008

new camera

Photobucket
I did the upgrade from the d300 to the 700 today and all i can say is wow.
So far i am extremely impressed. I have been shooting uncompressed raw files at 14 bit and they are tack sharp.
I would definately say that this is a camera that i could keep for a long time, or until a new one comes out (joke).
For this photo i took two seperate images, one focused on the d700 letters and one focused on the nikon letters.
I opened both in camera raw and had some fun with the settings, and drug the saturation down to -100.
I opened them in photoshop and placed one on top of the other. I then went into the layers palate and highlighted both layers (alt key I think and click on the layers to select them). Then go to edit - auto align layers. I use this often as it works very well, like in a group photo that half the people blink - just align the layers and use a mask..
then i applied a layer mask to the top layer and painted in black over the d700 letters to show through to the sharp ones underneath. I flattened the layers and sharpened the file quite a bit so i could see some good sized grain.
This image was shot at 3200asa.

Friday, September 12, 2008

off for the weekend

Photobucket
I took this shot the other day by absolute happen chance as i was shooting something else and i heard the flock coming.
I thought it was fitting as i am "flying out of the office" to start the weekend.